Introduction: The Magic of Paper Snowflakes
As the holiday season approaches, many people start thinking about festive decorations. One charming and simple way to enhance your home environment is by creating paper snowflakes. With easy paper snowflake instructions, you can transform ordinary sheets of paper into exquisite snowflakes that add warmth and beauty to any space. Whether you intend to hang them on windows, decorate your tree, or use them as table decorations, these delicate crafts provide charm at little cost. This article will guide you through the process of making stunning paper snowflakes while answering common questions about this delightful project.
Why Make Paper Snowflakes?
There are numerous reasons why crafting paper snowflakes is a beloved holiday tradition. Here are some compelling benefits:
- Cost-Effective Decor: Making paper snowflakes requires only a few fundamental materials, such as paper and scissors. This DIY project is an economical way to create beautiful decorations for your home.
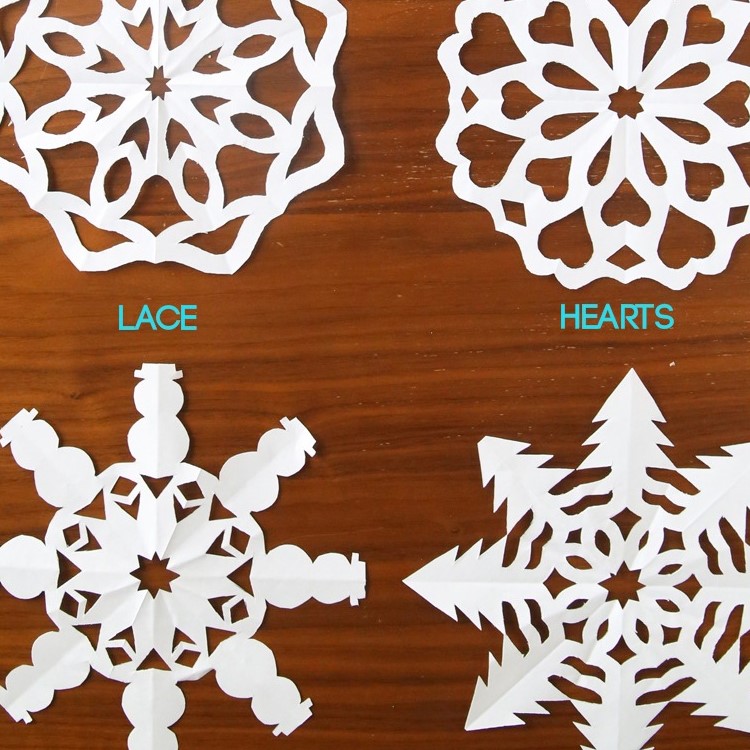
- Creative Outlet: Crafting snowflakes allows you to express your creativity. Each snowflake can be uniquely designed based on your imagination and preferences, ensuring your decorations stand out.
- Fun for All Ages: Making paper snowflakes is an enjoyable activity for children and adults alike. It encourages family bonding and can serve as a valuable teaching opportunity about symmetry and design.
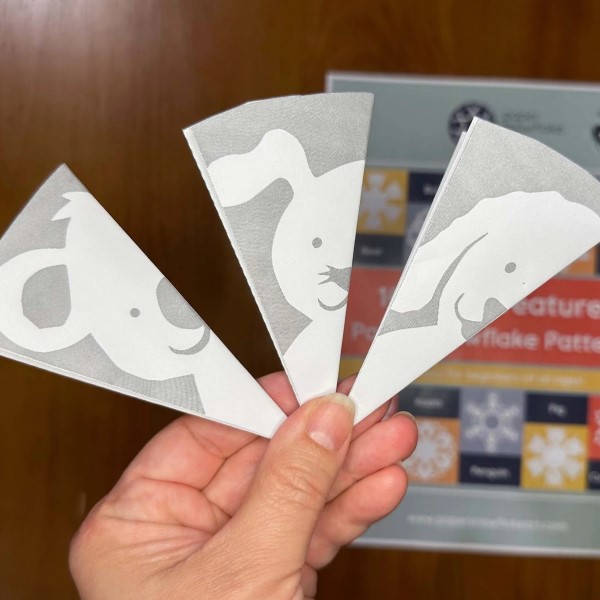
- Customization: You can choose various patterns, colors, and sizes of snowflakes to complement your holiday theme or personality. Customizing your snowflakes can make them more special.
- Quick and Easy: Unlike many elaborate crafts, making paper snowflakes is quick and straightforward. In just a short time, you can create several beautiful snowflakes.
Materials Needed for Paper Snowflakes
To start making your paper snowflakes, gather the following materials of paper snowflake instructions:
- Paper: You can use various types of paper, such as standard printer paper, construction paper, or even decorative scrapbook paper. The choice will influence the look and feel of your snowflakes.
- Scissors: A sharp pair of scissors is essential to cut cleanly through the paper. Having the right tools will enhance the quality of your finished projects.
- Ruler: A ruler is helpful if you want to measure your paper accurately when cutting squares or specific shapes. It can improve precision.
- Pencil: You may want to use a pencil to lightly sketch your designs on the paper before cutting. This allows for more intricate patterns.
- Tape or Adhesive: Once your snowflakes are complete, you’ll need tape or glue to affix them to surfaces for display. Ensure you have these ready for your decorating needs.
Step-by-Step Instructions for Making Paper Snowflakes
Creating beautiful snowflakes can be fun and rewarding. Here’s how to do it step by step:
Preparing the Paper
- Choose the Right Size: Start by cutting a square piece of paper. Common sizes range from 6 inches to 12 inches, depending on the desired snowflake size. A larger square will yield a bigger snowflake.
- Square Dimensions: To create a square from a rectangular sheet, fold one corner down to the opposite edge, aligning the sides. Cut off the excess paper to leave you with a perfect square.
Folding the Square
- First Fold: Take your square piece of paper and fold it in half diagonally. This forms a triangle, ensuring that the edges align for a precise fold.
- Second Fold: Fold the triangle in half again. Bring the two pointed ends towards each other to create a smaller triangle. This method increases complexity in your design once the snowflake is cut.
- Third Fold: For traditional snowflakes, take the outer corner of the triangle and fold it inward to create additional layers. This adds detail to the finished piece.
Cutting the Design
- Begin Cutting: With the folded paper in hand, start cutting shapes along the edges. You can make notches, curves, or points. Remember to be creative! Strive for a balance between intricate designs and easy cutting.
- Focus on Symmetry: As you cut, pay attention to symmetry. Snowflakes are typically symmetrical, which means the cuts on one side should mirror the other.
Unfolding the Snowflake
- Reveal Your Design: Carefully unfold the paper snowflake. This is an exciting moment, as you will see your unique design emerge. Take your time to avoid tearing the delicate paper.
- Adjusting the Shape: If any edges are uneven, you can trim them slightly to achieve a cleaner look.
Flattening and Decorating Your Snowflakes
After creating your beautiful paper snowflake instructions, it’s crucial to flatten them for display.
How to Flatten Paper Snowflakes
- Pressing Technique: Place your snowflakes between two heavy books and leave them for a few hours. This method will flatten the paper while preserving the design.
- Ironing Option: For stubborn curls, lightly press with an iron set on low heat. Ensure you’re using a protective cloth over the snowflake to avoid burning the paper.
- Avoiding Damage: While these methods will help flatten snowflakes, avoid excessive heat or pressure, as this can lead to tears or fading.
Adding Decorative Touches
To make your snowflakes stand out even more, consider these creative paper snowflake instructions:
Glitter
- Adding Sparkle: Glitter can enhance the beauty of your paper snowflakes dramatically. To achieve this sparkling effect, select a color that matches or contrasts beautifully with the base color of your snowflake.
- Application Process: Begin by applying a thin layer of white or clear-drying glue to specific areas of your snowflake. You can use a paintbrush or a fine-tip applicator for precision, ensuring the glue only goes where you want the glitter to stick.
- Sprinkling Glitter: Once the glue is applied, lightly sprinkle glitter over the glued areas. Make sure to do this over a tray or a piece of paper to catch any excess glitter for easy cleanup.
- Let it Dry: Allow the glue to dry completely before handling your snowflake. Once dry, gently shake off any excess glitter. This provides a beautiful, glimmering finish that catches the light and adds a festive touch to your decorations.
- Creating a Theme: You can use different colored glitters to create themed snowflakes. For example, use silver glitter for a classic look or pastel shades for a whimsical touch. This flexibility allows for creative expression.
Markers or Paint
- Outlining Designs: Using markers or fabric paint can help define and outline specific areas of your snowflake. Choose colors that enhance the overall design while adding contrast or complementing the base color.
- Selecting the Right Tools: Fine-tipped markers or paintbrushes work best for detailed work. If you’re using paint, select fabric paint for flexibility and better adherence, especially if you plan to hang the snowflakes for an extended period.
- Highlighting Features: Focus on the intricate designs of the snowflake. Use markers or paint to emphasize edges, curves, or cuts in the paper, effectively making your snowflake pop while adding visual interest.
- Color Palette Choices: Consider using a color palette that matches your holiday decor. For instance, traditional colors like red and green for Christmas, or pastels for spring decorations, can enhance the festive quality of your snowflakes.
- Experimenting with Techniques: Try different techniques, such as dotting, swirling, or filling in shapes with color. This experimentation can lead to unique designs that showcase your personal artistic style.
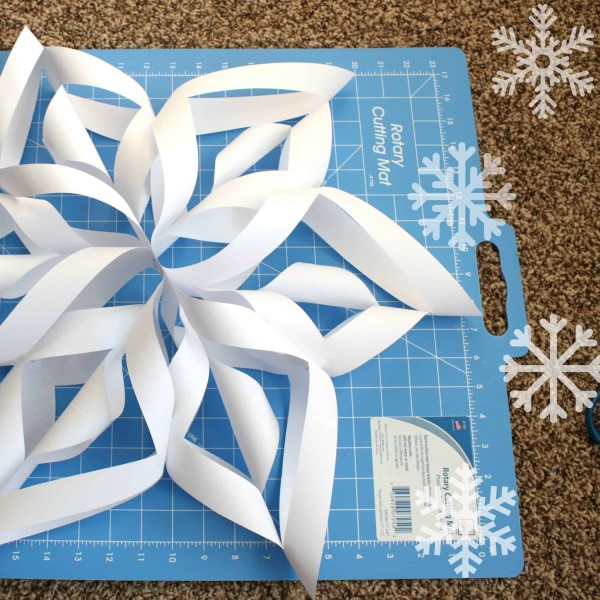
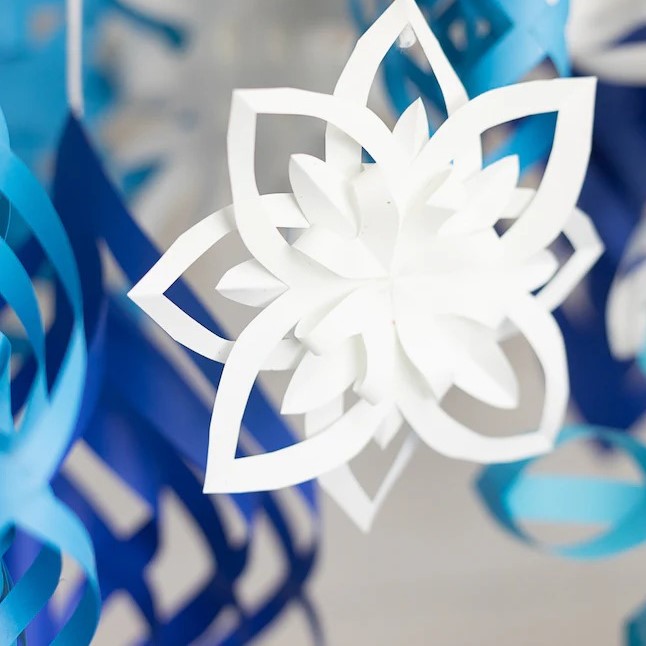
Layering
- Creating Depth: By producing multiple sizes of snowflakes, you can layer them to create a more dynamic and visually appealing decoration. Layering helps to give the illusion of depth and complexity to your decor.
- Color Coordination: When layering snowflakes, consider using varying shades of the same color, or contrasting colors, to create a cohesive look. This strategy adds interest while still maintaining harmony.
- Securing Layers: Use glue, double-sided tape, or foam dots to attach the smaller snowflakes to larger ones. Elevating smaller snowflakes slightly can add dimension and enhance visual appeal further.
- Display Ideas: Layered snowflakes can be displayed in various ways. For instance, they can be grouped together in clusters, hung separately in close proximity, or used as part of a larger decorative arrangement, such as wreaths or table centerpieces.
- Versatile Decorative Options: Layering snowflakes is not limited to just one hanging display. Consider using them in scrapbooks, gift wrapping, or as embellishments for cards, giving them additional versatility beyond standard decor.
Hanging Snowflakes
- Choosing a Hanging Method: To create a magical atmosphere, hang your snowflakes from the ceiling, windows, or doorways. Select a lightweight string or fishing line that blends with the decor, ensuring the snowflakes appear to “dance” in the air.
- Length Considerations: Varying the lengths of string creates visual interest. Some snowflakes should hang lower, while others can be positioned higher up. This variation enhances the illusion of depth and makes the décor more dynamic.
- Placement Tips: When hanging, consider how sunlight will interact with the snowflakes. Placing them in well-lit areas allows the glitter and colors to shine, creating an enchanting effect.
- Creating a Winter Wonderland: To achieve a winter wonderland vibe, cluster snowflakes together in groups, mimicking how they might naturally fall in nature. This arrangement creates an immersive experience that can delight guests.
- Seasonal Adjustments: To keep your decor fresh, consider changing the snowflakes throughout the winter season. You can switch designs and colors to align with different holidays or themes, ensuring your space remains captivating.
Frequently Asked Questions (FAQs)
How do I make a paper snowflake?
To make a paper snowflake, cut a square piece of paper, fold it diagonally to form a triangle, then cut patterns along the edges before unfolding to reveal your snowflake.
How to make a six-pointed paper snowflake?
Start with a square piece of paper and fold it in half three times to form a narrow triangle. Then, cut into the edges to create your design, ensuring to unfold it to show a six-pointed shape.
What kind of paper to make snowflakes?
You can use lightweight paper like printer paper or heavier options like construction paper for more durability. Decorative scrapbook paper is also perfect for varying designs.
How to flatten paper snowflakes?
Flatten your snowflakes by placing them between heavy books or by lightly pressing them with an iron on low heat with a protective cloth covering the snowflakes.
Conclusion: Let Your Creativity Shine with Paper Snowflakes
In conclusion, mastering paper snowflake instructions provides an exciting way to enhance your holiday decor while indulging in a creative craft. From the initial preparation of materials to the final unveiling of your snowflakes, this step-by-step guide ensures you can enjoy the process every step of the way. As you experiment with designs and techniques, you may find new ways to personalize your snowflakes and share them with friends and family. So gather your supplies, follow these instructions, and get ready to decorate your home with beautiful, handcrafted snowflakes that reflect the joy of the season! Happy crafting!


