Introduction: Get Ready for Thanksgiving with a Cute Turkey Craft
With Thanksgiving just around the corner, families everywhere are looking for fun and creative ways to celebrate the holiday. One exciting project you can undertake is creating a turkey paper plate craft. This quick and engaging craft is perfect for children and can be completed in just a few minutes. Not only will it keep little hands busy, but it also adds a festive touch to your home decor.
In this article, we will provide step-by-step instructions on how to create a colorful turkey using a simple paper plate. You will find suggestions for materials, tips for making the craft more engaging, and ideas for incorporating this activity into your Thanksgiving celebrations. By the end of this guide, you’ll be ready to impress your guests with your turkey craft!
Benefits of Creating a Turkey Paper Plate Craft
Fun and Educational Activity
- Hands-On Learning: Crafting provides a hands-on experience for children, helping them learn fine motor skills as they cut, glue, and create.
- Encouraging Creativity: This project allows kids to express their creativity. They can choose colors, patterns, and decorations, making each turkey unique.
- Thematic Relevance: Crafting a turkey aligns with Thanksgiving themes, helping children understand and appreciate the holiday’s significance through art.
Quick and Inexpensive
- Budget-Friendly Supplies: Most of the supplies required for this turkey craft are inexpensive and easily found around the house or at local stores. This keeps costs low while encouraging creativity.
- Time-Efficient: Compared to other crafts that may take hours or days, creating a turkey paper plate can often be done in just minutes. This makes it perfect for busy parents and teachers during the holiday season.
Materials Needed
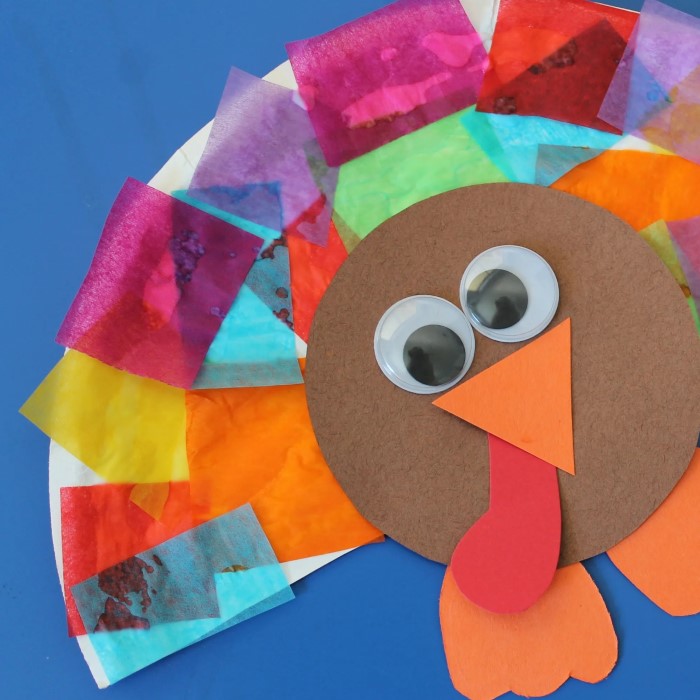
- Paper Plates: The main component of your turkey will be a plain paper plate. You can choose white or brown plates based on your design preference.
- Construction Paper: Gather various colors of construction paper, such as red, orange, yellow, and brown, for the turkey’s feathers and facial features.
- Scissors: A pair of scissors will be needed for cutting out shapes from the construction paper.
- Glue or Glue Stick: Use glue to attach the feathers and any other features onto the paper plate turkey.
- Markers or Crayons: For added decoration and personal touch, have markers or crayons ready for kids to color and draw on their turkeys.
- Googly Eyes (Optional): For a fun twist, include googly eyes to give your turkey some personality.
Step-by-Step Instructions
Prepare the Paper Plate
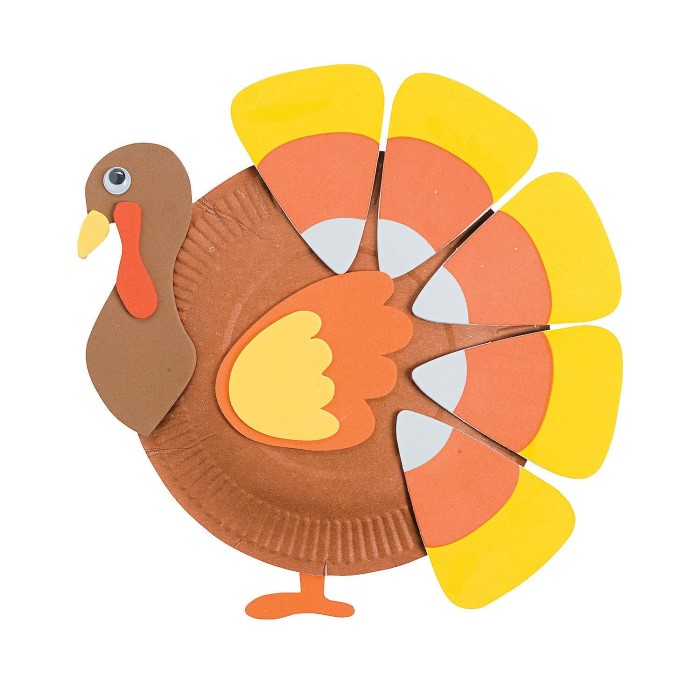
- Choose the Right Plate: Take a paper plate and position it so the flat side faces up. This will serve as the turkey’s body.
- Coloring the Plate: You can paint the plate brown to represent the turkey’s body. If you prefer a quicker option, leave it as is for a traditional white background.
Create the Turkey’s Features
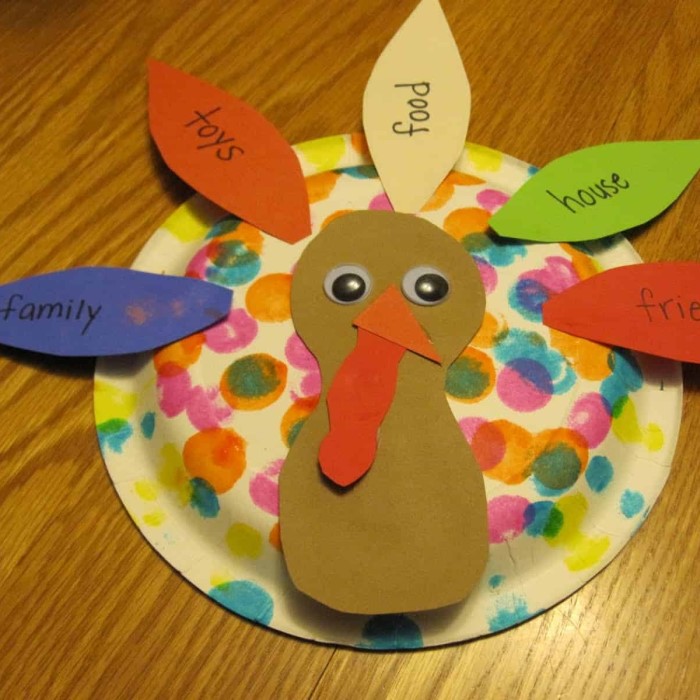
- Cut the Feathers: From your colorful construction paper, cut out long feather shapes. Aim for a variety of sizes to create visual interest. You’ll want at least six feathers in assorted colors for a vibrant look.
- Attach the Feathers: Use glue to attach the feathers to the back of the paper plate. Ensure they fan out and are visible from the front.
- Add the Face: Cut out a small circle from brown paper for the turkey’s head, then glue it at the top center of the plate. Use larger googly eyes or paper circles for the eyes and a small triangle for the beak.
Final Touches
- Add Details: Encourage kids to draw or color additional features on their turkey. They can add a waddle from red construction paper and create a colorful background on the plate.
- Personalize Your Craft: Allow older children to write what they are thankful for around the edges or on the back of the plate. This adds a personalized touch to the craft that can be cherished for years.
Displaying Your Turkey Craft
Showcasing Your Creation
- Use as Centerpieces: Place your turkey paper plates on the dining table as cheerful centerpieces during Thanksgiving dinner. They can serve as conversation starters and add a festive atmosphere to your gathering.
- Hang on Walls or Windows: With a little tape, easily hang paper plate turkeys on walls, windows, or doors. This will brighten up your home and highlight your holiday spirit.
- Involve the Family: Encourage everyone to create their own turkey crafts to display together. This creates a fun collage of various turkey styles, showcasing each person’s creativity.

More Fun Paper Plate Craft Ideas for Thanksgiving
Thankful Tree
- Creating the Base: Begin by taking a sturdy paper plate and using it as the foundation for your Thankful Tree. You can paint the plate brown or leave it as is to represent the trunk of the tree.
- Cutting Out Leaves: Gather various colors of construction paper, such as red, orange, yellow, and green, to cut out leaf shapes. You can use templates or simply draw freehand to create a variety of leaf sizes and styles.
- Writing What You’re Thankful For: Encourage family members or children to think about what they are thankful for and write their responses on the leaves using markers or pens. This activity sparks meaningful conversations and reflection on gratitude.
- Attaching Leaves to Branches: For branches, you can either draw them onto the plate or use additional strips of paper or brown construction paper to create a three-dimensional effect. Once your branches are ready, attach the leaves using glue or tape, arranging them in a visually pleasing manner.
- Display Your Thankful Tree: Once complete, find a prominent place in your home to display the Thankful Tree. It can serve as a reminder of gratitude during the Thanksgiving season, and the leaves can be easily updated as your feelings of gratitude evolve.
Pumpkin Paper Plates
- Transforming the Plate: Start with a plain paper plate and turn it into a pumpkin by cutting the plate into a basic pumpkin shape. Use orange construction paper or simply paint the plate orange to achieve the classic pumpkin color.
- Adding Details: For an added touch, you can cut leaf shapes from green construction paper and glue them to the top of the pumpkin to create a vine effect. Crafting curly vines with green paper or pipe cleaners can also enhance the pumpkin’s appearance.
- Combining with the Turkey Craft: This pumpkin plate craft perfectly complements the turkey paper plate craft you’ve previously made. Displaying them together can create a festive autumn scene that captures the spirit of the season.
- Creating a Pumpkin Patch Display: Consider making multiple pumpkin plates in varying sizes and styles to create an adorable pumpkin patch display. You can arrange them as a centerpiece for Thanksgiving or even use them as playful decorations around the house.
Fall Collage
- Using Leftover Materials: After completing your turkey craft, don’t throw away the leftover construction paper! Gather these scraps to create a vibrant Fall Collage, making use of all the colors associated with autumn.
- Cutting Out Fall Shapes: Use scissors to cut out various fall-themed shapes from the remaining construction paper. Common shapes include:
- Leaves: Create different types of leaves, such as maple, oak, or birch, in an assortment of colors.
- Apples: Cut out apple shapes in red, green, or yellow to showcase the apple harvest associated with fall.
- Acorns: These can be made by cutting out circular shapes and adding caps from another color of brown paper.
- Arrange the Collage: Find a larger piece of paper or a canvas to serve as the background for your collage. Start arranging your cut-out shapes in a visually appealing manner, placing leaves, apples, and acorns to give a sense of layering and depth.
- Secure the Pieces: Once satisfied with the arrangement, glue each piece down securely. You might also use markers to write fall-themed words or quotes around the collage, adding another layer of creativity.
- Display Your Fall Collage: After your collage is complete, find a suitable spot to display it. You can hang it on a wall, place it on a table, or even give it as a thoughtful gift to family or friends.

Frequently Asked Questions
- What materials do I need for the turkey paper plate craft?
You’ll need a paper plate, construction paper, scissors, glue, and markers or crayons. Optional items include googly eyes. - How long does it take to make this craft?
The turkey paper plate craft can be completed in about 15-30 minutes, making it a quick and enjoyable project. - Are there variations of this turkey craft for older kids?
Absolutely! Older children can add more intricate designs, use mixed media with paints, or include decorations like sequins for added flair. - Can I use the turkey paper plate for decoration?
Yes! These turkey plates make great holiday decorations and can serve as centerpieces or wall hangings during Thanksgiving.
Conclusion: Celebrate Thanksgiving with Creative Fun
In conclusion, making a turkey paper plate craft is an enjoyable and educational way to prepare for the Thanksgiving celebration. This simple project not only provides a creative outlet for children but also brings families together during the crafting process.
With easily accessible materials and straightforward instructions, anyone can get started, regardless of their crafting experience. So why not join in the fun this Thanksgiving? Gather your supplies, invite the family, and start making your delightful turkey paper plate crafts today. Happy crafting and happy Thanksgiving!


