Introduction
The Rubik’s Cube is a captivating puzzle that has mesmerized millions since its introduction in the 1980s. With its colorful squares and intricate challenges, it’s more than just a toy; it’s a symbol of problem-solving and cognitive skills. Among the various stages of solving the Rubik’s Cube, the Rubik’s Cube last layer is perhaps the most crucial and challenging part. Successfully completing the last layer not only brings you closer to finishing the puzzle but also acts as a gateway to advanced techniques and solving speeds.
In this comprehensive guide, we will explore everything you need to know about solving the last layer of the Rubik’s Cube. Whether you are just starting or looking to enhance your skills, this article is packed with step-by-step instructions, algorithms, and tips for avoiding common pitfalls. By mastering the last layer, you’ll not only impress your friends but improve your overall cubing ability. Let’s dive in!

Understanding the Last Layer
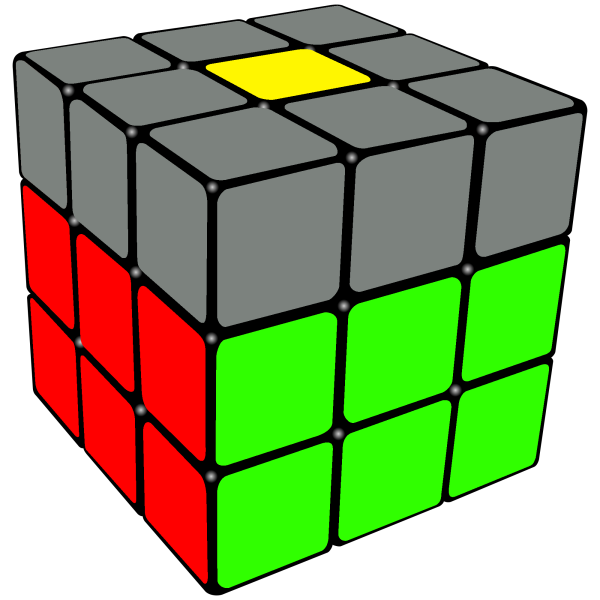
The last layer of the Rubik’s Cube consists of the top layer of stickers that need to be correctly oriented and positioned. It includes both corner and edge pieces that must be in the right place to complete the cube successfully. Understanding the last layer is essential, as it is the final step in the traditional solving method known as CFOP (Cross, F2L, OLL, PLL).
Before attempting to solve the last layer, it’s crucial to have the first two layers completed. Once those are aligned, attention can shift to the last layer, where the real challenge begins. Solvers must often deal with multiple scenarios, and each situation usually requires a different algorithm to resolve. This is why having a strong grasp of the last layer is essential for anyone looking to tackle the Rubik’s Cube proficiently.
Importance of Mastering the Rubik’s Cube Last Layer
Mastering the last layer is significant for several reasons. It not only improves your general problem-solving skills but also allows for quicker solve times, especially important for speedcubers. Additionally, advanced techniques applied to the last layer can lead to impressive results in competitions or casual play.
Now that we understand the importance of the last layer, let’s get into the nuts and bolts of solving it.
Step-by-Step Guide to the Rubik’s Cube Last Layer
The last layer can initially seem daunting, but by breaking it down into manageable steps, you can master it in no time. Below is a step-by-step guide to successfully navigating the Rubik’s Cube last layer.
1. Creating the Last Layer Cross
The first step in solving the last layer is to create a cross. This means that the edge pieces of the last layer should be oriented to form a plus sign (+) on the top. Start by identifying the correct positions based on the colors of the adjacent sides.
– Tip: If you find that the cross isn’t forming, check to ensure that the colors of the edges match the center pieces of the adjacent sides.
2. Positioning Corners Correctly
Once you have the cross, the next step is to position the corner pieces correctly. The goal is to ensure that these corner pieces are in the right location, even if they aren’t oriented correctly.
– Tip: Use the right algorithms to cycle the corner pieces until they fall into their correct positions.
3. Orienting Corners
After positioning the corners, the next challenge is to orient them correctly so that the top color matches the center square.
– Tip: There are specific algorithms designed to flip the corner pieces without disturbing their position. Ensure you practice these algorithms until they become second nature.
4. Positioning Edges
Next, focus on positioning the edge pieces of the last layer. The edges need to match not only the top color but also the colors of the adjacent sides.
– Tip: Edge positioning algorithms will help you move any misplaced edge piece into its correct place, completing your cross.
5. Final Alignment
Once both corners and edges are in their places, you will perform one last move to lock everything in.
– Tip: Make sure all pieces are correctly aligned. This step often solidifies your entire solution and ensures that your cube is fully solved.
By thoroughly practicing each of these steps, you will find that the last layer becomes much more manageable over time.
Algorithms for the Rubik’s Cube Last Layer
Algorithms are a crucial component of solving the Rubik’s Cube last layer efficiently. Below are some essential algorithms that every cuber should be familiar with:
Notation Explanation
Before diving into the algorithms, let’s briefly discuss the notation used to describe moves:
– R = Right face clockwise
– L = Left face clockwise
– U = Upper face clockwise
– D = Down face clockwise
– F = Front face clockwise
– B = Back face clockwise
Adding an apostrophe (‘) after a letter means to turn that face counterclockwise.
Key Algorithms
1. OLL (Orientation of the Last Layer):
To orient the last layer edges correctly, a commonly used algorithm is:
– F R U R’ U’ F’
2. PLL (Permutation of the Last Layer):
For edge positioning, the algorithm can be:
– U R U’ L’ U R’ U’ L
3. Corner Orientation:
To flip corners correctly without changing their position:
– R U R’ U R U2 R’
Make sure to practice these algorithms until you can execute them quickly and without hesitation.
Common Mistakes and How to Avoid Them
Even experienced cubers make mistakes when tackling the Rubik’s Cube last layer. Here are some common pitfalls and how to avoid them:
1. Skipping Steps
One common mistake is skipping a step due to overconfidence or impatience. Each stage is vital for achieving the final solution, especially creating the last layer cross.
– Solution: Always follow the steps in order, assuring yourself that each part is complete before moving on.
2. Incorrect Algorithms
Using the wrong algorithm can lead to frustration. Misapplying algorithms often complicates the puzzle rather than simplifying it.
– Solution: Familiarize yourself with the algorithms. Write them down or create flashcards to reinforce your understanding.
3. Misaligned Pieces
Having misplaced pieces can often be attributed to incorrect finger placements or poor recognition of cube orientations.
– Solution: Take your time to recognize the orientation of the cube and ensure your fingers are positioned correctly on the faces you’re about to turn.
By being aware of these common mistakes and following the suggested solutions, you can significantly improve your performance on the last layer.
Advanced Techniques and Strategies
For those who have mastered the fundamentals and are looking to refine their skills further, there are advanced techniques worth exploring:
1. F2L (First 2 Layers) Improvements
Improving your F2L technique can streamline your solving process. Focus on solving pairs of pieces (corner and edge) instead of one piece at a time. This approach saves time and enhances overall efficiency—crucial for speedcubers.
2. ZBLL (Zbigniew’s Last Layer) Strategies
ZBLL is a set of algorithms designed specifically for solving the last layer in one step, regardless of its orientation. Mastering ZBLL algorithms can dramatically decrease your solving time.
3. Practice Speed Techniques
Engage in speedcubing practices by learning to solve the Rubik’s Cube under timed conditions. Use a timer app or attend local cubing gatherings to practice in a competitive environment.
These advanced techniques can help you cut down solve times and elevate your cubing skills to new heights.
Conclusion
Mastering the Rubik’s Cube last layer is essential for anyone serious about solving the cube. This final stage not only challenges your problem-solving abilities but also opens the door to advanced cubing techniques and strategies. By following the steps provided in this guide, understanding key algorithms, and avoiding common mistakes, you will improve your skills tremendously.
Practice is crucial—set aside time to work through the last layer until you feel comfortable. Whether you’re a beginner or a seasoned speedcuber, there’s always room for improvement. So grab your Rubik’s Cube, apply these methods, and enjoy the feeling of completing a perfectly solved cube!
By implementing this information and expanding your knowledge, you’ll gain confidence and speed, ultimately enhancing your overall cubing experience. Happy cubing!


