Introduction to the Wonder of Potato Power
Science education is vital for young minds. It sparks curiosity and innovation. One of the most classic experiments is the potato battery. This simple project fascinates children and adults alike. It transforms a common vegetable into a source of energy. Consequently, it serves as a perfect introduction to chemistry and physics. Many students encounter this experiment in school. However, few truly understand the mechanics behind it. This guide aims to demystify the process.
We will explore how a potato can power a small clock or light up an LED. Furthermore, we will delve into the scientific principles. You do not need expensive equipment. Therefore, it is accessible for everyone. Parents and teachers can easily organize this activity. It encourages hands-on learning. It also promotes critical thinking. The potato battery is more than just a trick. It is a gateway to understanding electricity. In this article, we will provide a step-by-step guide. We will also discuss the educational benefits. Get ready to unlock the potential of produce.
The Science Behind the Electrochemical Cell
To understand the experiment, we must look at the science. A potato battery is actually an electrochemical cell. It converts chemical energy into electrical energy. This process involves two different metals. These metals are called electrodes. Typically, we use copper and zinc. The potato acts as the electrolyte. An electrolyte is a substance that contains ions. It facilitates the flow of electricity.
- The Electrodes: We use two different metals for the electrodes. Copper acts as the positive terminal (cathode). Zinc acts as the negative terminal (anode). These metals have different electrical potentials. This difference creates a voltage.
- The Electrolyte: The potato contains phosphoric acid. This acid is the electrolyte. It causes a chemical reaction with the metals. The zinc electrode loses electrons. These electrons travel through the wire. They eventually reach the copper electrode. This flow of electrons is the electric current.
- The Reaction: Zinc oxidizes in the potato. It loses electrons. Meanwhile, hydrogen ions in the acid gain electrons at the copper electrode. This process is reduction. The combination of oxidation and reduction creates the power source.
Therefore, the potato itself does not generate electricity. Instead, it provides the environment for the chemical reaction. The energy actually comes from the metal electrodes. This distinction is important for students. It clarifies the role of each component. Understanding this science makes the experiment more meaningful. It moves beyond simple magic tricks.
Essential Materials for Your Experiment
Gathering the right materials is the first step. You likely have many of these items at home. However, you may need to visit a hardware store for the metals. Quality materials ensure a successful experiment. Here is a detailed list of what you need.
- Potatoes: You will need at least one large potato. Some experiments use two or three to increase voltage. Choose firm, fresh potatoes. Soft or rotting potatoes will not work well. They lack the necessary moisture and acid content.
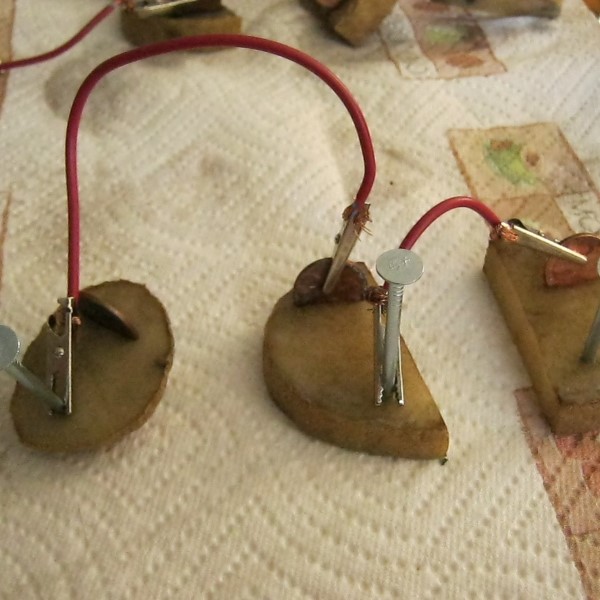
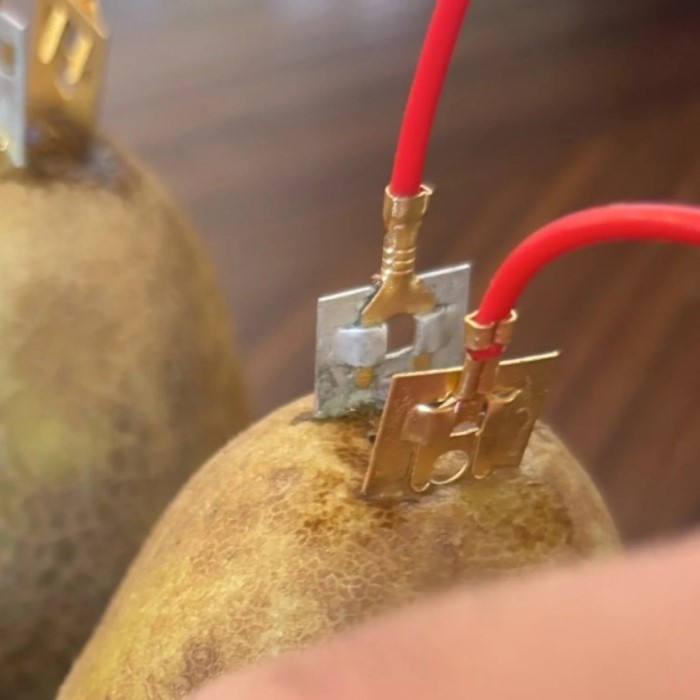
- Copper Electrodes: You can use copper wire or copper nails. Copper coins work too, but they must be pre-1982. These coins contain more copper. A strip of copper flashing is ideal. Clean the copper before use. This ensures a good connection.
- Zinc Electrodes: Galvanized nails are the most common source of zinc. “Galvanized” means they are coated with zinc. You can find these at any hardware store. Make sure they are not rusted. Zinc washers are another option.
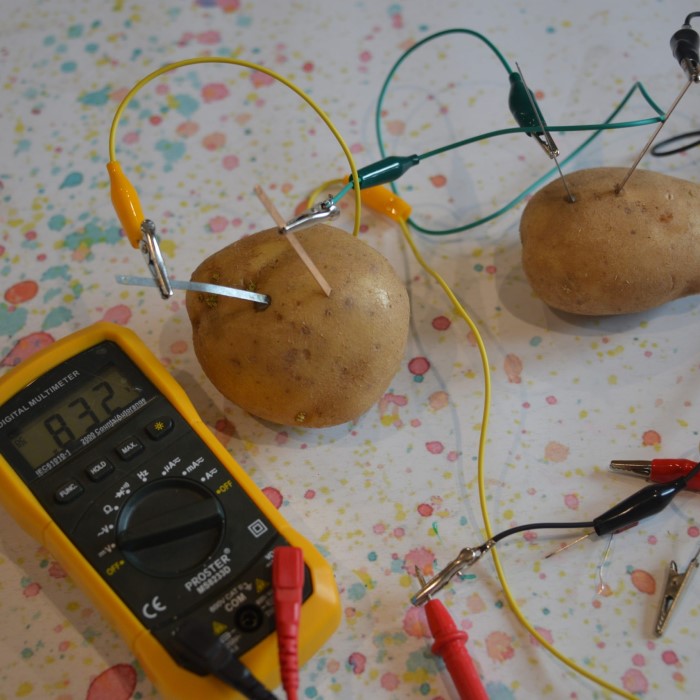
- Alligator Clip Wires: You need insulated copper wires. They should have alligator clips on the ends. These clips make connections easy. You will need three wires. Red and black wires help distinguish polarity.
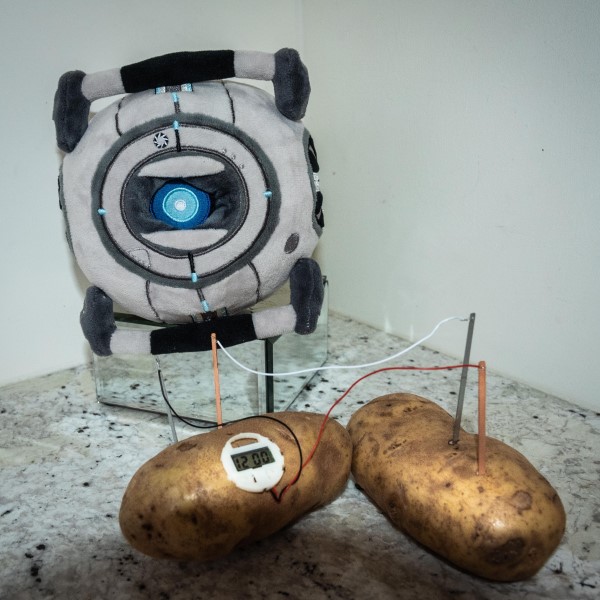
- A Low-Voltage Device: You need something to power. A digital clock or calculator works best. Look for a device that runs on 1 to 2 volts. An LED light is also a popular choice. However, LEDs require a specific flow of current.
Having everything prepared makes the process smooth. It prevents frustration later. Lay out your materials on a clean surface. This organization is a good scientific practice.
Step-by-Step Guide to Building the Battery
Now, let’s build the potato battery. Follow these instructions carefully. Patience is key. It may take a few tries to get a good connection.
- Prepare the Potatoes: Wash the potatoes thoroughly. Dry them with a paper towel. If you are using multiple potatoes, label them. This helps keep track of the circuit.
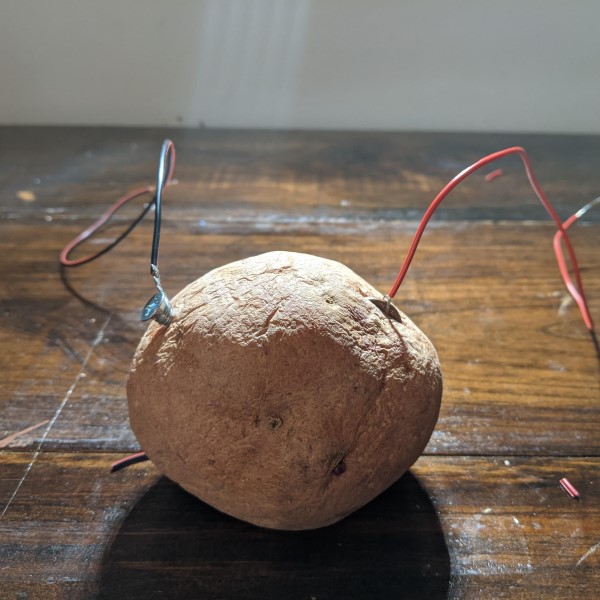
- Insert the Electrodes: Take one galvanized nail. Push it into the potato. Leave about half an inch sticking out. Do not push it all the way in. Next, take a piece of copper. Insert it into the potato near the nail. Ensure the copper and zinc do not touch inside the potato. If they touch, the circuit will short out. Repeat this for all potatoes.
- Connect the Wires: Take one alligator clip. Connect it to the copper electrode of the first potato. Connect the other end to the positive terminal of your device. Usually, the positive terminal is red. Take another wire. Connect it to the zinc electrode of the last potato. Connect the other end to the negative terminal.
- Complete the Circuit: If you are using multiple potatoes, connect them in series. Connect the zinc of the first potato to the copper of the second. This adds the voltage of each potato together. Check all connections. Make sure the clips are tight.
Once the circuit is complete, your device should turn on. If it does not, check the connections first. Wiggle the wires slightly. Sometimes the contact is loose. You might need to move the electrodes closer together. However, do not let them touch.
Troubleshooting Common Issues
Sometimes, the experiment does not work immediately. Do not get discouraged. Troubleshooting is part of the scientific process. There are several common reasons for failure. Here are some solutions to try.
- Check the Connections: This is the most common issue. Alligator clips can be loose. Ensure the metal bites into the electrode. Sometimes the coating on the wire prevents contact. Strip the ends of the wire if necessary.
- Electrode Polarity: You must connect the wires correctly. The copper is positive. The zinc is negative. If you reverse them, the current will not flow. Try switching the wires on your device.
- Low Voltage: One potato produces about 0.5 to 0.9 volts. This might not be enough for some devices. Try adding another potato. Connect them in series. This increases the voltage. Three or four potatoes can power a small LED.
- Depleted Electrodes: The chemical reaction consumes the zinc. If your battery stops working, check the nail. It might be corroded. Try sanding the nail. Or, use a fresh nail. The potato might also dry out. Use a fresh, juicy potato for best results.
Keep trying different configurations. Science is about experimentation. Note what works and what does not. This data is valuable. It helps you understand the system better.
Expanding the Experiment for Educators
Teachers can use this project for various grade levels. It fits into chemistry and physics curriculums. However, you can expand it further. Encourage students to explore variables. This promotes the scientific method.
- Test Different Electrolytes: Do potatoes work best? Try lemons, apples, or oranges. Compare the voltage of each fruit. Discuss why some work better than others. The acidity level is a major factor.
- Test Different Electrodes: Does copper and zinc work best? Try aluminum or iron. Compare the results. Students will learn about the electrochemical series. This explains why certain metals generate more voltage.
- Series vs. Parallel Circuits: Teach students about circuit types. Connecting potatoes in series increases voltage. Connecting them in parallel increases current. This is a fundamental concept in electronics. Have students draw diagrams of their circuits.
- Data Analysis: Have students record their findings. They can create graphs. They can measure the voltage with a multimeter. This integrates math skills into the science lesson.
These extensions make the project more rigorous. They move beyond a simple demonstration. Students engage in genuine inquiry. This leads to deeper learning and retention.
Safety Precautions and Clean Up
Safety is always a priority in science. The potato battery is generally safe. However, there are still precautions to take. Electricity and chemicals require respect.
- Do Not Eat the Potatoes: After the experiment, the potatoes are not safe to eat. They have been exposed to metal ions. Chemical reactions have occurred inside them. Discard the potatoes in the trash. Wash your hands thoroughly after handling the electrodes.
- Wire Safety: The wires are conductive. Do not connect them to a wall outlet. This is extremely dangerous. Only use low-voltage batteries or generators. Be careful with the sharp ends of the nails. Do not prick your fingers.
- Galvanized Nails: The coating on galvanized nails can be flaky. Avoid inhaling any dust. Do not rub your eyes while handling them. Safety goggles are a good idea. They protect the eyes from accidental pokes.
- Clean Up: Dispose of the potatoes properly. Clean the electrodes. You can reuse the wires and clips. Wipe down the work surface. Leave the area clean for the next experiment.
By following these rules, you ensure a safe learning environment. Teaching safety habits early is important. It sets the stage for future scientific work.
Frequently Asked Questions About Potato Power
Many people have questions about this experiment. Here are answers to the most common queries.
How many volts can you get from a potato battery?
A single potato battery typically produces about 0.5 to 0.9 volts. The exact voltage depends on the size of the potato. It also depends on the freshness and the metals used. Connecting multiple potatoes in a series can increase the voltage. For example, two potatoes might produce 1.5 volts. This is enough to power a small digital clock.
How many hours does a potato battery last?
A potato battery can last for a few days. It depends on the load connected to it. If you are powering a small LED, it might last for a few hours. If you are powering a clock, it could last longer. Eventually, the zinc electrode will dissolve. The potato will also dry out. When this happens, the voltage will drop. The battery will stop working.
Does charging your phone with a potato work?
Technically, it is possible. However, it is not practical. A phone requires a significant amount of power. You would need hundreds of potatoes connected together. This would generate enough voltage and current. But it would be a massive waste of food. It is not an efficient way to charge a device. It is a fun theoretical experiment, but not a realistic solution.
Conclusion: The Power of Curiosity
The potato battery remains a timeless experiment. It teaches us about the hidden energy in everyday objects. It illustrates the basic principles of electricity. Furthermore, it inspires a love for science. Through this simple project, students learn about chemical reactions and circuits. They also learn problem-solving skills. The process of trial and error is invaluable. We hope this guide has been helpful. We encourage you to try this at home or in the classroom. Remember to experiment with different materials. See what works best for you. The world of science is vast and exciting. It all starts with a simple question. And sometimes, it starts with a potato. Keep exploring and stay curious. The next great discovery could be yours.