Introduction
In today’s digital age, finding engaging and creative activities for kids is more important than ever. One classic project that continues to delight children is the cootie catcher—also known as a fortune teller or paper fortune teller. This simple yet delightful paper toy is perfect for crafting sessions, allowing kids to unleash their creativity while having fun with friends. Not only is it amusing, but it also encourages interaction and imagination. How to make a cootie catcher? Crafting a cootie catcher is an enjoyable experience that parents, teachers, or caregivers can introduce to children, making it perfect for school projects, birthday parties, or rainy days. In this detailed guide, we will explore the art of making a cootie catcher from start to finish, highlighting the essential materials, step-by-step instructions, and creative ideas for decoration. Everyone, including children, can take part in this exciting DIY project.
Understanding
1. What is a Cootie Catcher?
A cootie catcher is a playful origami-style paper toy that allows for a fun interactive experience.
- Interactive Entertainment: It can be used to ask questions and get responses, often in the form of silly fortunes or tasks. Kids love engaging with the cootie catcher, especially when they see it as a personal fortune-telling device.
- Cultural Significance: This paper toy has been a popular pastime across generations, offering simple entertainment paired with the joy of creating something unique.
2. How Does It Work?
A cootie catcher operates based on a series of folds and openings, creating pockets for surprises.
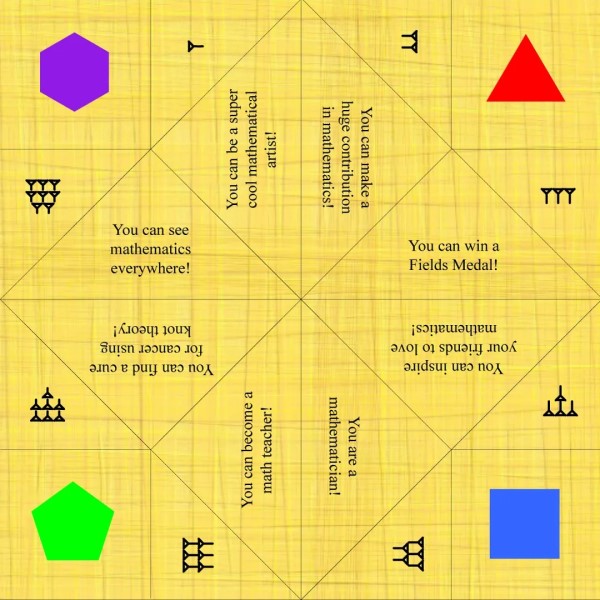
- Fortune-Telling: Players choose numbers or colors displayed on the outside, and each selection reveals fortunes, challenges, or silly tasks hidden inside the flaps.
- Endless Customization: One of the beauties of creating a cootie catcher is the opportunity to personalize it with drawings, colors, and individualized fortunes that resonate with the child’s interests.
Materials Needed
1. Essential Supplies
To make your own cootie catcher, you’ll need a few basic materials:
Square Paper
- Starting Material: Begin your cootie catcher project with a square piece of paper. The size and type of paper you choose can impact the overall appearance and functionality of the cootie catcher.
- Types of Paper: Standard printer paper is a great choice because it’s readily available and easy to work with. However, using colorful scrapbook paper can add an extra layer of fun and creativity to the finished product. The choice of paper can also reflect the personality and interests of the child creating the cootie catcher.
- Typical Size: The most common size for a cootie catcher is 8 inches by 8 inches. This size allows enough space for clear folding and writing fortunes. However, you are encouraged to experiment with different sizes. Smaller cootie catchers can be cute and portable, while larger ones may provide more area for elaborate decorations.
- Custom Sizing Options: If you want to explore different dimensions, consider cutting larger sheets or using specialty papers to create custom-sized cootie catchers. Just remember that the folding instructions will remain the same regardless of the size.
Markers or Colored Pencils
- Essential Decoration Tools: Markers or colored pencils are crucial for decorating the cootie catcher and bringing it to life. They enable kids to personalize their cootie catchers, making them unique expressions of their creativity.
- Variety of Colors: Having a variety of colors on hand enhances the creative process. Kids can choose different hues for various aspects of the design, such as drawing patterns, borders, or simply adding vibrant accents.
- Creativity and Expression: Encourage children to let their imagination shine while decorating. They can outline shapes, create spirals, or even write fun fortunes or prompts inside the cootie catcher. This activity promotes creativity and artistic expression.
- Making Choices: Discuss the importance of choosing colors that go well together or contrast effectively. Teaching kids about color theory can enhance their designs and make the cootie catcher visually appealing.
Scissors
- Cutting Capability: Although you might not need scissors for the basic folding process, they are essential if you’re starting with a rectangular piece of paper. Scissors allow you to trim the paper down to the correct square size effectively.
- Types of Cuts: Depending on the design and size of the paper, you may need scissors to make precise cuts. For instance, if creating custom shapes or adding decorative edges, a good pair of scissors will help achieve the desired look.
- Safety First: When using scissors, it’s important to supervise young children closely to ensure their safety. Teach proper scissors handling techniques, such as keeping fingers clear of the blades and cutting away from the body.
- Introduce Kids to Safety: For younger children who may not be experienced with scissors, consider using child-safe scissors. These have rounded tips and help reduce the risk of accidents while allowing them to participate in cutting activities.
2. Optional Materials
Enhance the crafting experience with additional materials:
- Stickers: Kids love stickers! Using themed stickers can add personality to the cootie catcher, making it even more visually appealing.
- Stencils: Stencils can help create neat shapes or letters on the cootie catcher, enabling kids to craft designs beyond what they can accomplish freehand.
Step-by-Step Guide
1. Prepare Your Paper
How to make a cootie catcher? Start by preparing your paper for folding. If you have a rectangular sheet, cut it into a square.
- Creating a Square: To make an 8-inch square from a standard letter-sized sheet, fold one corner to the opposite edge, and cut off the excess part. Then, unfold to reveal your square.
2. Fold the Cootie Catcher
Follow these steps to fold your cootie catcher:
- First Fold: Fold the square paper diagonally from one corner to the opposite corner to form a triangle. Crease the fold well, as it will guide subsequent folds.
- Second Fold: Unfold the triangle, and fold the paper diagonally in the opposite direction to create another triangle. Again, ensure the crease is sharp.
- Corner Folds: Take each of the four corners of the square and fold them towards the center point. This is the beginning of forming the pockets that will hold the fortunes.
- Turning Over: Flip the paper over so the points you just folded are underneath. Repeat the corner folds, bringing each corner into the center, which will further compact the structure.
3. Decorating the Cootie Catcher
Now comes the fun part—decorating your cootie catcher!
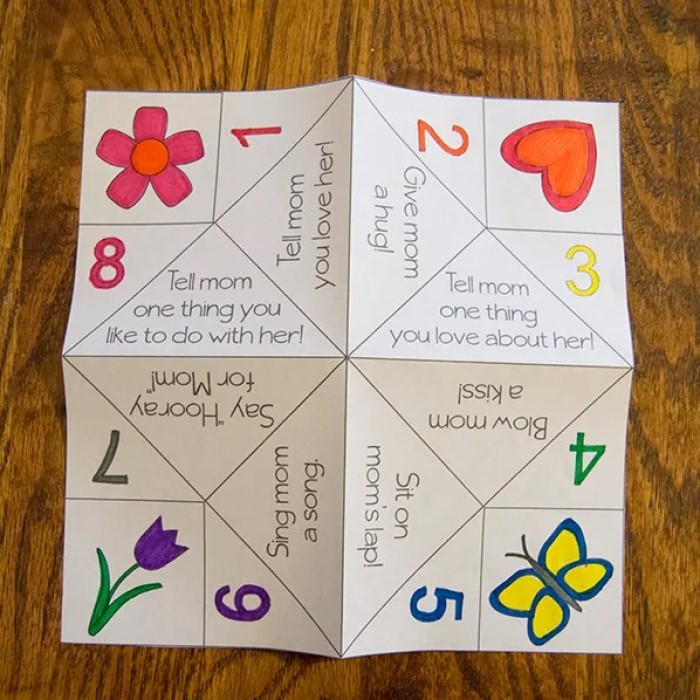
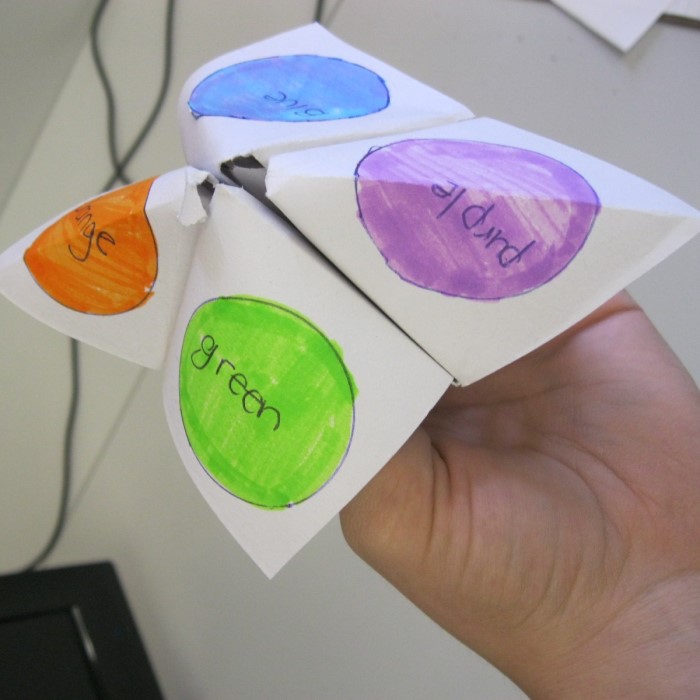
- Adding Colors: Using markers or colored pencils, allow kids to personalize the outside with fun designs, vibrant colors, or doodles that reflect their personality or interests.
- Writing Fortunes: Open the triangular flaps on the underside to reveal the interior. Write fortunes, silly tasks, or playful prompts beneath each flap. This step can be tailored to make each cootie catcher unique and tailored to the child’s humor or favorite topics.
Tips for Using Your Cootie Catcher
1. How to Use It
How to make a cootie catcher? To engage with the cootie catcher, follow these simple steps:
- User Engagement: Ask a friend or family member to choose a number or color visible on the outside of the cootie catcher. Count out loud while actively moving the cootie catcher, opening and closing the flaps based on their selection.
- Revealing the Fortune: After counting and moving, ask the player to choose one flap to open. This action reveals the fortune or task written inside, prompting discussions or laughter based on what’s uncovered.
2. Creative Variations
Consider customizing the game to make it even more enjoyable:
- Themed Cootie Catchers: Make different cootie catchers for various occasions—birthdays, holidays, or special events. Customize designs and fortunes accordingly to reflect the theme.
- Challenge Variations: Instead of writing fortunes, use the inner flaps to assign funny tasks or challenges. This can encourage shared laughter and fun group interactions.
Additional Ideas
1. Incorporating Learning
How to make a cootie catcher? Cootie catchers can also be a learning tool.
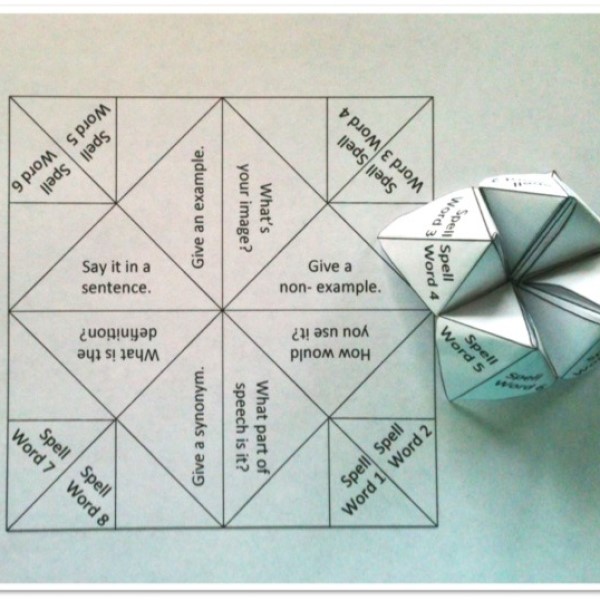
- Educational Themes: Create cootie catchers that incorporate math problems, spelling words, or trivia questions. This can make learning more interactive and engaging for kids.
- Language Practice: For language learners, cootie catchers can be designed to practice vocabulary or phrases, turning a fun activity into a learning experience.
2. Birthday Party Activity
Cootie catchers can serve as a delightful activity during birthday parties:
- Party Favors: Consider customizing cootie catchers to give out as party favors. Kids love taking home something fun that they actively participated in making.
- Group Challenges: At a party, organize a cootie catcher-making station where guests can create and decorate their unique designs. This fosters creativity and promotes social interaction.
Frequently Asked Questions
What are cootie catchers called now?
Cootie catchers are often called “fortune tellers” or “pocket fortune tellers.” These names reflect their function and the playful nature of predicting outcomes.
How to make a giant cootie catcher?
To make a giant cootie catcher, simply use a larger square of paper, such as poster board. Follow the same folding instructions for a larger version that’s even more fun to play with.
How to make a DIY fortune teller?
A DIY fortune teller is made using the same folding techniques utilized in making a cootie catcher. Customize it with your chosen fortunes or tasks for a unique experience.
What age is appropriate for cootie catchers?
Cootie catchers are suitable for a wide range of ages, typically enjoyed by children aged 5 and up. They can also be fun for teens and adults participating in creative activities.
Conclusion
How to make a cootie catcher? Creating a cootie catcher is an enjoyable, interactive experience that fosters creativity and encourages social interaction among children. This timeless paper toy not only entertains kids but allows them to engage with peers meaningfully. By following the step-by-step instructions outlined in this guide, anyone can design and create their own cootie catchers filled with personalized fortunes and tasks.
As we embrace 2026, the excitement of crafting and playing with cootie catchers remains timeless. They serve as more than simple crafts; they become cherished moments of laughter and creativity. So gather your materials, unleash your imagination, and introduce your children to the joy of making their own cootie catchers. This fun DIY project guarantees memorable moments for both kids and parents alike!