Introduction
Cold process soap making is a traditional and effective way to create homemade soap. This method uses natural ingredients and requires patience as the soap cures over time. It allows for customization with various designs, scents, and additives, resulting in unique and personal creations.
What is Cold Process Soap?
Cold process soap is made without external heat, relying on a chemical reaction called saponification. This reaction occurs when oils mix with lye to form soap. Unlike melt and pour techniques, cold process soap is crafted entirely from scratch. The end product is natural and handmade, often free from commercial additives and harsh chemicals.
Benefits of Cold Process Soap Making
Cold process soap making has several advantages:
- Control over ingredients: You can ensure soap contains natural oils and avoids harmful chemicals.
- Customizable designs: Add unique patterns, colors, scents, and additives to suit your needs.
- Gentle on skin: Handmade soap often has moisturizing properties, ideal for sensitive skin.
- Environmentally friendly: Use sustainable and natural ingredients for eco-conscious soap options.
The process is rewarding and allows you to create high-quality soap tailored to your preferences.
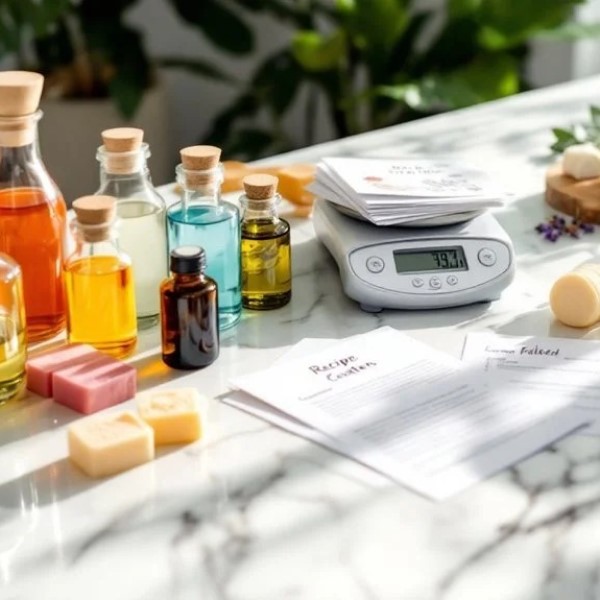
Essential Ingredients and Tools
When starting cold process soap making, having the right ingredients and tools is essential. Proper preparation ensures smooth crafting and high-quality results. Knowing what to gather beforehand simplifies the process.
Key Ingredients Needed for Soap Making
- Oils and Butters: These are the base for soap. Popular choices include olive oil, coconut oil, and shea butter.
- Lye: An essential component for saponification, often sodium hydroxide for cold process soap.
- Distilled Water: Used to dissolve lye and achieve the desired consistency.
- Scents: Essential oils or fragrance oils add delightful aromas.
- Colorants and Additives: Natural colorants like clays, spices, or mica enhance your soap’s appearance.
- Additional Ingredients: Ingredients like dried herbs or exfoliants enrich the soap and enhance its functionality.

Equipment Checklist for Soap Making
- Scale: Use a digital scale for precise ingredient measurement.
- Heatproof Containers: Glass or stainless steel bowls are best for mixing lye and oils.
- Thermometer: A digital or infrared thermometer helps track lye and oil temperatures.
- Immersion Blender: Speeds up trace, the stage where soap thickens during mixing.
- Soap Molds: Silicone molds or lined boxes shape soap bars.
- Rubber Spatulas: Essential for scooping and mixing. Use heat-resistant ones.
- Safety Gear: Gloves, goggles, and long sleeves protect skin and eyes during lye handling.
- Measuring Cups and Spoons: Ensure accurate measurement of smaller ingredients.
Careful selection of ingredients and tools ensures success in cold process soap making. These essentials support creativity and functionality.
Step-by-Step Process
To successfully create cold process soap, follow this step-by-step guide. It will help you craft beautiful and high-quality homemade soaps.
Preparing Your Workspace
- Choose a Safe and Clean Area: Select a well-ventilated space with no distractions.
- Protect Surfaces: Cover work surfaces with newspapers or plastic sheets to prevent messes.
- Organize Tools and Ingredients: Lay out your soap molds, measuring tools, oils, lye, water, and additives.
- Wear Safety Gear: Put on gloves, goggles, and long sleeves to protect your skin and eyes.
- Keep Safety Materials Handy: Have vinegar nearby to neutralize lye spills.
- Check Ventilation: Ensure proper airflow to avoid inhaling lye fumes.
Measuring and Mixing Ingredients
- Measure Oils and Butters: Use a digital scale for precise amounts.
- Melt Solid Oils: Heat solid oils like coconut or palm oil until fully melted.
- Prepare Your Lye Solution:
- Measure distilled water.
- Slowly add lye to water, stirring until dissolved. Never pour water into lye.
- Allow the lye solution to cool to around 100–110°F.
- Check Temperatures: Ensure oils and the lye solution are within 5–10 degrees of each other.
- Combine Lye and Oils: Pour the lye solution into the oils slowly, stirring constantly.
- Blend to Trace: Use an immersion blender until the mixture thickens slightly. This is called “trace.”
Pouring and Setting the Soap
- Prepare Mold: Line the soap mold, or use a silicone mold for easy removal.
- Add Colors and Scents: Stir in colorants, essential oils, or other additives after reaching trace.
- Pour Soap Mixture: Carefully pour the soap mixture into the prepared mold.
- Tap Out Air Bubbles: Gently tap the mold on the table to remove trapped bubbles.
- Insulate the Mold: Cover the mold with a towel or lid to maintain consistent temperature during saponification.
- Allow to Set: Leave the soap undisturbed for 24–48 hours to harden.
Following these steps ensures your cold process soap making is smooth and successful. Stay focused and enjoy the creative experience!
Safety Tips and Precautions
When making cold process soap, safety is essential. Handling certain ingredients, especially lye, requires caution. Mistakes can be hazardous, so planning and preparation are vital.
Handling Lye Safely
Lye is a necessary ingredient in cold process soap making, but it is highly corrosive. Follow these guidelines to handle it safely:
- Wear Proper Safety Gear: Always wear gloves, safety goggles, and long sleeves to protect your skin and eyes.
- Work in a Well-Ventilated Area: Lye produces fumes when mixed with water. Use a space with good airflow.
- Add Lye to Water, Not the Other Way Around: Slowly pour lye into cool, distilled water. Stir gently to avoid splashing.
- Use Heatproof Materials: Mix lye in heat-resistant containers, such as glass or stainless steel.
- Avoid Contact with Skin: If lye touches your skin, flush immediately with cool, running water and apply vinegar to neutralize it.
- Keep Children and Pets Away: Lye is dangerous, so it’s essential to keep your workspace clear of distractions.
- Store Properly: Store lye away from heat or moisture in a secure, labeled container.
- Dispose of Lye Carefully: Don’t pour it directly down the drain. Follow local disposal guidelines.
Tips for Avoiding Common Mistakes
Mistakes can happen, but you can prevent most with preparation and focus. Here are helpful tips:
- Measure Accurately: Use a digital scale to measure ingredients. Small errors can affect soap quality.
- Use the Correct Recipe: Follow reliable recipes with accurate calculations for lye and oils.
- Monitor Temperatures: Keep oils and lye within 5–10°F of each other when mixing.
- Don’t Rush the Process: Patience is key. Let the lye solution cool before combining with oils.
- Blend Properly: Don’t overblend or underblend. Stop when reaching thin to medium trace.
- Avoid Overheating the Soap: Insulate molds properly, but prevent overheating to avoid cracks.
- Store Soap Carefully: Keep soap in a dry, cool area while curing to prevent sweating or discoloration.
- Test Additives: Use a small batch to test new colors, fragrances, or designs before scaling up.
Practicing these safety tips and avoiding common mistakes will make cold process soap making enjoyable. Prioritize safety and accuracy, and your crafting experience will be both productive and satisfying.
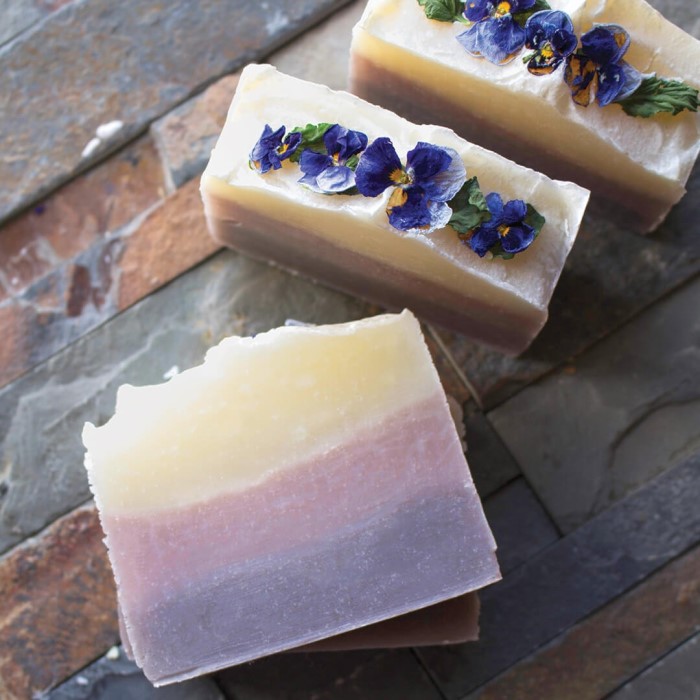
Customizing Your Soap
Customizing your cold process soap adds a personal touch to your creation. You can enhance it with vibrant colorants, delightful scents, and unique designs. This section guides you on how to make your soap truly one-of-a-kind.
Adding Colorants and Scents
Using colorants and scents is a fun way to personalize your soaps. Here’s how to get started:
- Choose Natural Colorants: Use clays, spices, or mica powders. They are safe and create earthy tones.
- Prepare Essential Oils: Select oils like lavender, lemon, or peppermint for natural aromas.
- Dilute Fragrance Oils: If using synthetic fragrances, ensure they are suitable for soap crafting.
- Combine at Trace: Add color or scent when the soap reaches trace to mix evenly.
- Use Precise Amounts: Measure all additives to maintain balance and avoid overpowering.
- Blend Thoroughly: Stir carefully to spread colors and scents throughout the mixture.
Adding customized colorants and scents enhances the soap’s aesthetic and sensory appeal.
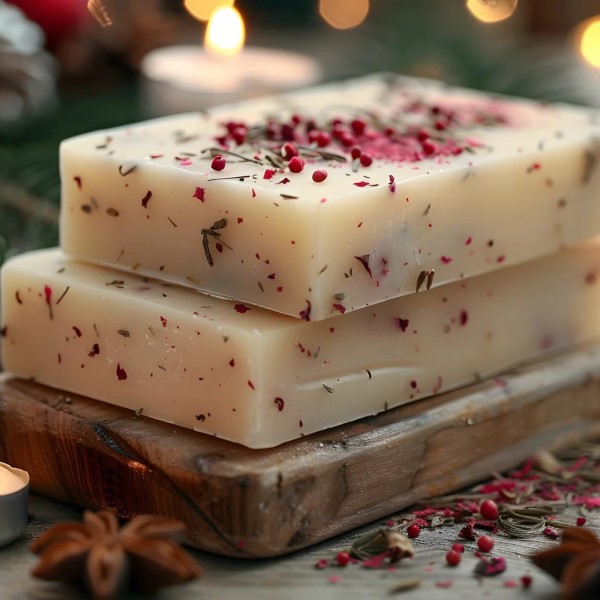
Incorporating Natural Additives and Designs
Make your soaps more functional and visually appealing with natural additives and creative designs:
- Use Dried Botanicals: Add dried lavender, rose petals, or calendula for texture and beauty.
- Include Exfoliants: Ground oats, crushed shells, or coffee grounds provide gentle scrubbing effects.
- Test Patterns: Create swirls, layers, or marble effects using contrasting colors.
- Explore Embedding Options: Embed small soap shapes or objects for decorative appeal.
- Try Decorative Molds: Select playful molds to shape unique, intricate designs.
- Experiment Wisely: Test new techniques on small batches before scaling up.
These steps let you craft a soap that is both functional and artistic. Tailored customization makes your creation distinct and enjoyable.
Troubleshooting Common Issues
Even with careful preparation, issues can arise during cold process soap making. Knowing how to troubleshoot common problems ensures successful results.
Fixing Problems with Texture or Appearance
Soap texture and appearance can be affected by various factors. Here are common problems and solutions:
- Soap is Too Soft or Sticky: This occurs when soap hasn’t cured properly.
- Solution: Allow extra curing time. Increase air circulation around soap.
- Soap Cracks on Surface: Overheating during saponification may cause cracks.
- Solution: Insulate molds carefully but avoid excessive heat retention.
- Soap is Grainy: Graininess may result from improperly dissolved lye.
- Solution: Ensure lye is fully dissolved in water before mixing with oils.
- Discolored Soap: Discoloration happens due to additives or overheating.
- Solution: Test new colorants in small batches and avoid high temperatures.
- Separation of Layers: Oils and lye may separate if poorly blended.
- Solution: Blend thoroughly and ensure correct oil-to-lye ratio.
Addressing these issues helps achieve a smooth, appealing soap texture and appearance.
Resolving Issues with Scent or Performance
Scent and soap performance can vary due to additive choices or formulation errors. Here’s how to fix issues:
- Weak Scent: Using too little fragrance or essential oil may cause subtle aromas.
- Solution: Measure oils carefully and follow recommended usage rates.
- Overpowering Scent: Too much fragrance can irritate skin or overwhelm senses.
- Solution: Reduce the amount of fragrance and always test for balance.
- Soap Doesn’t Lather Well: Lack of lather often results from an imbalance in oils used.
- Solution: Adjust recipes to include bubbly oils like coconut oil.
- Soap Doesn’t Clean Effectively: Improper saponification can lead to soap lacking cleaning properties.
- Solution: Check lye calculations and ensure all ingredients combine properly.
- Rapidly Fading Scent: This can happen if fragrance oils aren’t soap-safe.
- Solution: Choose high-quality, stable fragrance oils for lasting aromas.
Troubleshooting these scent and performance issues ensures your cold process soap meets expectations and functions effectively.
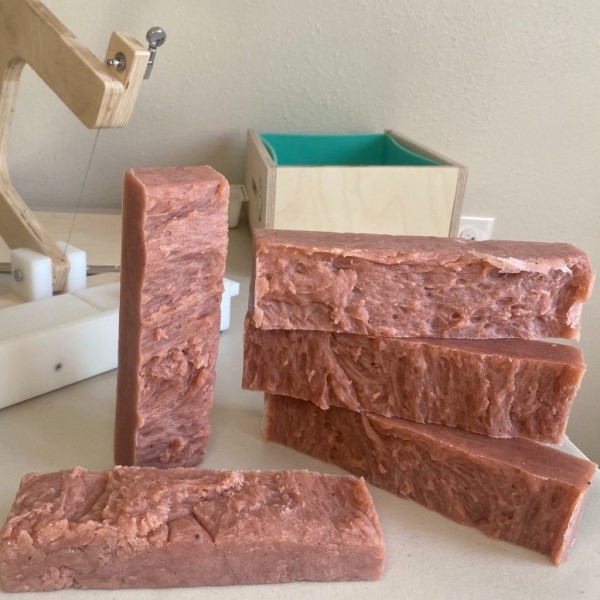
Curing, Cutting, and Storing Soap
Proper curing, cutting, and storing of cold process soap are crucial for achieving the best results. These steps ensure your soap is effective, long-lasting, and visually appealing.
How to Cure Soap Properly
Curing is essential for hardening and improving the quality of your soap. Follow these steps to cure your soap effectively:
- Remove From Mold: After 24–48 hours, gently take the soap out of the mold.
- Cut the Soap: Slice the soap into bars using a knife or soap cutter while still slightly soft.
- Choose a Curing Area: Select a cool, dry, and well-ventilated spot for curing.
- Use a Rack or Grid: Lay the soap bars on a wire rack or airy surface for even airflow.
- Space Bars Apart: Leave gaps between bars to prevent moisture buildup.
- Allow to Cure for 4–6 Weeks: This time helps excess water evaporate and completes saponification.
- Rotate Bars Periodically: Flip soap bars weekly for consistent curing and drying.
- Test Before Use: Ensure complete curing by checking for hardness and pH balance.
Curing properly enhances the soap’s lather, hardness, and longevity.
Cutting and Storing Soap for Longevity
Cutting and storing your soap correctly retains its quality and increases its shelf life:
- Cut Uniformly: Slice soap bars evenly for better drying and easier use.
- Use a Soap Cutter: A wire soap cutter ensures straight and clean-cut bars.
- Store in a Dry Space: Keep soap in a cool, dry, and ventilated area.
- Avoid Airtight Containers: Let soap breathe by avoiding sealed containers during curing.
- Stack or Rack Properly: Arrange bars neatly without crowding.
- Protect From Direct Sunlight: Sunlight can discolor or soften soap.
- Use Wax Paper for Wrapping: If wrapping, choose breathable materials like wax paper.
- Label and Date Soap: Organize soap batches for tracking curing and use times.
Effective curing, cutting, and storing ensure your cold process soap stays luxurious and functional for longer.
Final Thoughts on Cold Process Soap Making
Cold process soap making is an enriching hobby that allows you to create beautiful, personalized products. The methods and techniques discussed in your ultimate cold process soap making guide enable you to unlock your creativity while producing unique, skin-friendly soaps. Remember always to prioritize safety when handling ingredients, and don’t hesitate to experiment with new recipes and designs. Enjoy the journey of soap making, and cherish the satisfaction that comes with crafting something special with your own hands!