Introduction
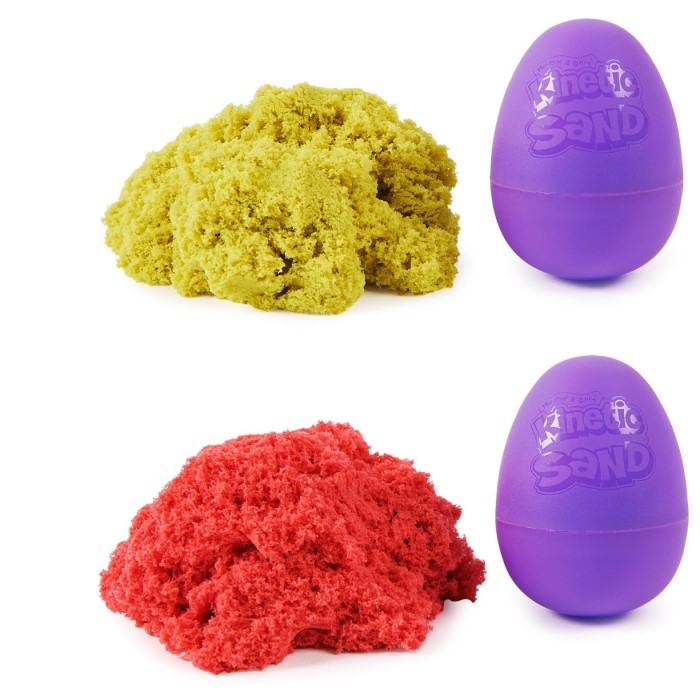
Kinetic sand is a unique crafting material loved by kids and adults alike. It is soft, moldable, and easy to work with, making it ideal for creating Easter-themed crafts. Kinetic sand provides countless opportunities for creativity, especially when designing Easter eggs that stand out. Unlike traditional materials, it offers a mess-free and exciting way to craft. Let’s explore why it’s such a fantastic choice for Easter decorations.

Benefits of Using Kinetic Sand for Easter Crafts
- Mess-Free Crafting: Kinetic sand sticks to itself, reducing the mess typically associated with crafting.
- Reusable Material: You can reshape kinetic sand multiple times, making it perfect for adjustable designs.
- Safe for Kids: Non-toxic and soft, kinetic sand is suitable for children of all ages.
- Promotes Creativity: Its moldability encourages imaginative designs and artistic expression.
- Ideal Texture: The texture allows for precise shaping and adding intricate details to Easter eggs.
Why Choose Kinetic Sand Over Traditional Materials
- Flexibility in Designing: Unlike plastic or papier-m?ché, kinetic sand adapts to any shape easily.
- Ease of Customization: You can add colors, glitter, or other decorative elements to kinetic sand.
- Durability: Kinetic sand creations hold their form well, ideal for crafting sturdy Easter eggs.
- Stress-Free Handling: No glue or drying time is needed, simplifying the crafting process.
Creating Easter eggs with kinetic sand turns crafting into a joyful, stress-free activity. Its versatility and ease of use make it the perfect material for fun and beautiful Easter decorations.
Essential Supplies for Making Kinetic Sand Easter Eggs
Creating artistic kinetic sand Easter eggs starts with gathering the right supplies. Having appropriate tools ensures smooth crafting and better results. Below, we’ll explore the essentials.
Types of Kinetic Sand
Choosing the right kinetic sand is crucial for your Easter egg designs. Here are the common types:
- Traditional Kinetic Sand: Soft and moldable, this type is suitable for most basic designs.
- Glitter Kinetic Sand: Sparkly sand adds an extra decorative touch to your eggs.
- Colorful Kinetic Sand: Available in a variety of vibrant shades, making it ideal for colorful creations.
- Scented Kinetic Sand: Adds a sensory experience with festive scents perfect for Easter.
- Natural-Tone Sand: Great for realistic-looking eggs with earthy tones.
When selecting kinetic sand, consider the theme and desired appearance of your Easter eggs.
Recommended Molds and Tools
Using the right molds and tools makes shaping and decorating easier. Essential tools include:
- Egg-Shaped Molds: Perfect for uniform and professional-looking egg shapes.
- Detailing Tools: Use sculpting sticks or plastic knives for intricate patterns and designs.
- Rolling Pins: Helps flatten sand before placing it into molds.
- Cookie Cutters: Great for adding unique shapes and patterns onto the eggs.
- Decorative Items: Glitter, beads, and stickers to personalize your kinetic sand Easter eggs.
Invest in quality tools to make the crafting process stress-free and enjoyable. These supplies not only simplify decorating but also inspire creativity in your designs.
Step-by-Step Guide to Crafting
Creating kinetic sand Easter eggs is an enjoyable and straightforward process. Follow these steps to complete your masterpiece. Gather your supplies and let your creativity lead the way.
Preparing Kinetic Sand for Shaping
- Choose the Sand Type:Select traditional, glitter, or colorful kinetic sand based on your design ideas.
- Fluff and Loosen:Knead the sand gently to soften and prepare it for shaping.
- Adjust the Amount:Measure enough sand to fill your molds without overflowing.
Techniques for Shaping and Sculpting Eggs
- Use Egg Molds:Pack sand tightly into egg-shaped molds to get a uniform design.
- Hand-Sculpting:Make free-form designs with your hands for unique, creative shapes.
- Flatten Before Adding Details:Use a rolling pin or flatten the sand before introducing decorative patterns.
- Smooth Edges:Shape the edges neatly with detailing tools for polished results.
Adding Decorative Details to Your Creations
- Apply Glitter:Sprinkle glitter for sparkle and festive cheer.
- Use Beads or Stickers:Incorporate beads or stickers for themes and patterns.
- Create Swirls:Blend sand colors to design intricate swirls and patterns.
- Carve Patterns:Utilize sculpting tools to add textures, lines, or floral motifs.
These steps ensure a simple crafting process and beautiful kinetic sand Easter eggs. Experiment with colors, designs, and accessories for personalized creations. Happy crafting!
Creative Design Ideas
Creating unique kinetic sand Easter eggs offers a fun way to showcase your creativity. You can experiment with different patterns, themes, and textures for stunning results. Below are some inspiring ideas to elevate your designs.
Colorful Patterns and Swirls
- Combine Colors: Mix different colors of kinetic sand to achieve beautiful, vibrant patterns.
- Create Swirls: Blend two or more colors in a swirling motion for an artistic look.
- Gradient Designs: Layer sand shades in a gradient tone to make eggs visually appealing.
- Rainbow Effect: Arrange multiple colors in a rainbow style for extra festive cheer.
- Stripes and Dots: Use sculpting tools to carve stripes or dots into the sand for striking details.
Themed Easter Egg Ideas
- Animal Themes: Sculpt bunny ears, chick wings, or sheep patterns on your eggs for Easter symbolism.
- Floral Motifs: Add flower shapes or carve spring-like patterns using detailing tools.
- Festive Symbols: Create crosses, eggs, or basket shapes to represent Easter traditions.
- Character Designs: Depict cartoon or storybook characters popular with kids.
- Customized Names: Craft eggs with carved names for personalized gifts.
Incorporating Glitter or Textures
- Glitter Finish: Sprinkle glitter on your eggs for sparkle and festive appeal.
- Textured Layers: Use sculpting sticks to create textured patterns like zig-zags or waves.
- Beaded Details: Press small beads into the sand for intricate design elements.
- Sticker Decorations: Apply stickers for vibrant and themed enhancements.
- Natural Looks: Use earthy tones and rough textures for realistic egg designs.
These creative ideas can make your kinetic sand Easter eggs exceptional. Experiment with colors, themes, and decorative items to craft one-of-a-kind creations. Have fun exploring endless design possibilities!
Fun Activities with Finished Kinetic Sand Easter Eggs
Turn your kinetic sand Easter eggs into the centerpieces of fun-filled activities. These delightful creations are perfect for engaging kids and making your celebrations memorable. Here are some exciting ways to enjoy your kinetic sand eggs.
Easter Egg Hunts with Kinetic Sand Eggs
- Organize a Treasure Hunt: Hide the kinetic sand Easter eggs around your house or backyard. Let kids search for them.
- Surprise Inside: Hide small trinkets or candy within the kinetic sand eggs for added excitement.
- Create Clues: Write simple clues that lead to the hidden eggs for a fun scavenger hunt.
- Team Challenge: Divide kids into teams and see who collects the most eggs.
- Theme Hunts: Add themed elements, like pirate treasures or enchanted forests, for a unique experience.
An Easter egg hunt with kinetic sand eggs adds fun and creativity to your celebration. It offers loads of thrill for both kids and adults.
Display and Decoration Ideas
- Table Centerpieces: Arrange the colorful kinetic sand eggs in a basket or tray for festive décor.
- Seasonal Displays: Place them with flowers and greenery on a shelf or mantel.
- Dramatic Lighting: Add string lights to highlight the glitter and colors of the eggs.
- Festive Wall Art: Attach smaller eggs to a wreath or frame for a unique seasonal decoration.
- Gift Bags: Use your kinetic sand eggs as creative gift additions for friends and family.
Displaying your kinetic sand Easter eggs not only brightens your space but also showcases your artistic skills. These engaging decoration ideas will keep the Easter spirit alive and impressive!
Tips and Tricks for Working with Kinetic Sand
Creating with kinetic sand can be highly enjoyable, but it does require proper care and techniques for the best results. Here are some tips to help you maintain your kinetic sand and avoid common crafting mistakes.
How to Maintain Kinetic Sand Texture
- Store in an Airtight Container: Keep kinetic sand in a sealed container to prevent it from drying out.
- Keep It Clean: Use a sieve to remove debris like dust or dirt to maintain the sand’s smooth texture.
- Add a Few Drops of Water: If the sand feels dry, mix in a few drops of water to revive its softness.
- Avoid Humidity: Store your kinetic sand in a cool, dry place to prevent clumping or stickiness.
- Handle with Clean Hands: Ensure your hands are clean to avoid transferring oils or dirt to the sand.
- Re-knead Regularly: Frequently knead the sand to keep it fresh and moldable for crafting.
Following these tips will ensure your kinetic sand stays in excellent condition for future crafts.
Avoiding Common Mistakes While Crafting
Overfilling Molds
- Impact on Design: Overfilling molds can cause kinetic sand to spill over, leading to incomplete shapes. This issue not only disrupts the intended design but can also result in wasted materials.
- Sticking Problems: When molds are overfilled, the excess sand can get stuck in the corners or edges. This makes it difficult to remove the molded shapes cleanly, compromising the overall aesthetic.
- Tip for Success: To avoid these issues, always fill the molds to the recommended level, ensuring you leave enough space at the top for proper sealing.
Skipping the Flattening Step
- Importance of Flattening: Flattening the sand before starting your project is crucial. This step ensures a more uniform texture and helps prevent air pockets that can cause uneven surfaces.
- Achieving Smoothness: By taking the time to flatten the sand, you create a more polished look for your finished product. Smooth surfaces are particularly important for intricate designs or for areas that will be painted or decorated later on.
- Practical Approach: Use a straight edge or a flat tool to aid in the flattening process. This simple technique can significantly enhance the final quality of your crafts.
Using the Wrong Tools
- Precision Matters: Utilizing appropriate shaping and decorating tools is vital for effective crafting. Using the wrong tools can lead to imprecise shapes, uneven edges, and a lack of detail.
- Investing in Quality Tools: Invest in quality tools specifically designed for working with kinetic sand. Items like molds, scrapers, and sculpting tools can improve your overall crafting experience and outcome.
- Selecting the Right Tools: Regular kitchen utensils may not provide the desired results. Consider looking for specialized craft tools that cater to kinetic sand for better precision and ease of use.
Applying Excess Water
- Understanding Consistency: Adding water to kinetic sand can enhance its moldability; however, excessive moisture can lead to sticky sand that becomes difficult to work with.
- Challenges with Stickiness: When sand becomes overly wet, it loses its desired texture, making it challenging to create clean shapes. The sticky consistency can hinder creative processes and frustrate young crafters.
- Best Practices: Instead of dumping water directly into the sand, mist it lightly using a spray bottle. This method gives you more control over moisture levels and keeps the sand workable without compromising its texture.
Not Cleaning Workspaces
- Importance of a Clean Workspace: A clean workspace helps maintain the quality of your kinetic sand projects. Dirt and dust mixed with the sand can ruin the texture and appearance of your finished crafts.
- Preventing Contamination: Make it a habit to clean your work area before starting any project. Remove any foreign particles that might accidentally find their way into the sand, ensuring a pristine working environment.
- Cleaning Tools and Surfaces: Use a damp cloth to wipe down surfaces and keep craft tools free of debris. This small step can lead to a more enjoyable crafting experience and better results.
Storing Near Heat Sources
- Impact of Heat on Kinetic Sand: Storing kinetic sand near heat sources, such as radiators or direct sunlight, can lead to drying out. This condition affects the sand’s texture and workability, making it less enjoyable to use.
- Long-Term Effects: If kinetic sand loses its moisture content, it may become crumbly and less pliable. This change compromises the sand’s unique quality that allows it to hold shapes.
- Ideal Storage Conditions: Store kinetic sand in a cool, dry place away from heat sources. Use airtight containers to maintain its texture, ensuring it remains ready for crafting when needed.
Properly caring for your kinetic sand can save you effort and make your crafting sessions more enjoyable. Following these simple tips and avoiding common errors will help your kinetic sand Easter eggs turn out perfectly every time!
Where to Buy and Store Kinetic Sand for Easter Crafts
Finding high-quality kinetic sand and storing it correctly will enhance your Easter craft experience. Proper sourcing and storage ensure the sand remains fresh and reusable for multiple projects.
Best Stores to Purchase High-Quality Kinetic Sand
Here are some recommended places to find kinetic sand:
- Craft Stores: Stores like Michaels and Hobby Lobby offer a variety of kinetic sand options.
- Toy Shops: Many toy stores provide child-friendly brands with colorful and glittery kinetic sand.
- Online Retailers: Websites like Amazon offer an extensive range of kinetic sand and bulk packs.
- Department Stores: Popular chains like Walmart or Target often stock kinetic sand in their craft sections.
- Specialty Stores: Stores focusing on sensory products may have scented and unique kinetic sand varieties.
Choose trusted suppliers to ensure the sand’s quality and safety for crafting.
Proper Storage for Reusability
Storing kinetic sand properly keeps it usable and mess-free for a long time. Use these tips:
- Airtight Containers: Store sand in sealed containers to maintain its texture and prevent drying.
- Cool, Dry Places: Keep it away from heat and humidity to avoid clumping or losing quality.
- Separate by Type: Store colored, glitter, or scented sand in separate containers to preserve their features.
- Clean It Regularly: Use a sieve to remove dirt and debris that may build up over time.
- Avoid Outdoor Storage: Protect sand from exposure to moisture, which can damage its moldability.
Proper storage ensures your kinetic sand stays fresh and ready for future Easter crafts. Following these simple guidelines maximizes its longevity and quality for creative projects.
Conclusion: Embrace Kinetic Sand Easter Eggs for Fun and Creativity
In conclusion, kinetic sand Easter eggs offer an excellent opportunity for creativity, play, and learning during the spring season. With their unique texture and moldability, kinetic sand transforms ordinary crafts into engaging projects for kids and families alike. By exploring various designs, educational benefits, and display options, you can make the most of your kinetic sand experience. As you embrace these creative ideas, remember to celebrate the joy of crafting and the arrival of spring through kinetic sand Easter eggs. Whether as decorations or enjoyable activities, these whimsical creations will surely become a cherished part of your Easter festivities.


