Introduction
Crafting is a wonderful way to express creativity, and in 2025, one of the most versatile materials available is paper mache clay. This medium effectively combines the traditional method of paper mache with the smooth, moldable characteristics of clay. Whether you’re crafting decorative items, sculptures, or functional pieces, mastering paper mache clay allows crafters to achieve impressive results with minimal effort. The ability to create unique, durable, and artistic pieces that stand out makes this medium incredibly appealing. This article will explore various tips, recipes, and techniques that can help you refine your skills and unleash your artistic potential when working with paper mache clay.

Understanding Paper Mache Clay
Before diving into crafting, it’s essential to understand what mache clay is and what it offers. Paper mache clay is not just a simple mix; it consists of multiple components that enhance its usability and effectiveness. The primary ingredients include:
- Paper: Commonly, old newspapers or scrap paper are used, which are easy to find and recycle. The paper provides structure and texture once incorporated into the mix.
- Adhesive: Glue, typically PVA or white school glue, plays a crucial role in binding the materials together. The amount of glue used can greatly influence the final texture of the clay.
- Water: Water is essential for achieving the right consistency. It helps to create a malleable paste that can be easily molded.
- Optional Ingredients: Some recipes add flour, cellulose, or even natural binders to improve texture and strength.
A Step-by-Step Guide
Creating your own mache clay is a straightforward and rewarding process. Below is a detailed recipe that you can easily follow:
Ingredients Needed:
- Old newspapers or paper strips: Aim for at least 2-3 sheets.
- PVA glue: Approximately 1 cup.
- Water: About 1 cup.
- Optional Additives: A tablespoon of flour or cellulose to improve texture.
Step-by-Step Instructions:
- Prepare the Paper: Tear the newspaper into small strips, roughly 1 inch wide. Tearing is preferable to cutting, as torn edges blend better in the paste.
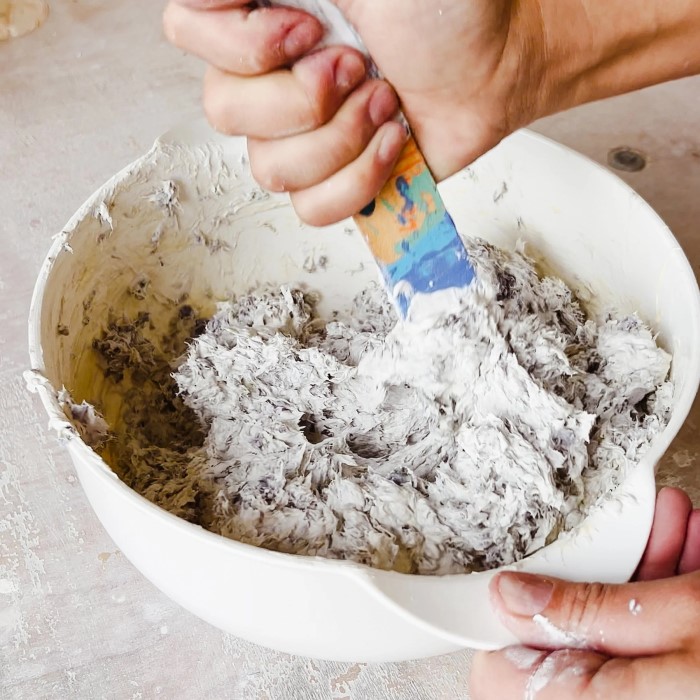
- Create the Paste: In a large bowl, mix the water and PVA glue. Stir thoroughly until completely combined.
- Add the Paper: Introduce the torn paper pieces into your glue and water mixture. Ensure that every piece is thoroughly saturated.
- Blend Until Smooth: For best results, transfer the mixture into a blender or food processor. Blend until you achieve a smooth, clay-like consistency.
- Incorporate Optional Ingredients: If you desire extra strength or texture, add a tablespoon of flour or cellulose to the mixture, blending again until fully incorporated.
- Storage: Store any leftover mixture in an airtight container in the refrigerator. It can last up to a week, but use it as soon as possible for optimal workability.
By following these steps, you’ll have homemade paper mache clay ready for all your creative projects.
Tips for Perfecting Your Crafting Skills
Perfecting your skills in working with paper mache clay takes time and practice. Here are some essential tips to improve your crafting experience:
- Start with Simple Projects: As a beginner, opt for smaller, more manageable projects. This way, you can become familiar with the material without feeling overwhelmed.
- Work in Layers: If you’re creating larger pieces, consider using a layering technique. Start with a solid base made from traditional paper mache and cover it with a layer of paper mache clay for added texture and detail.
- Keep Tools Handy: Have essential tools ready, such as sculpting tools, knives, and flexible spatulas. These tools will help you manipulate and shape the clay more effectively.
- Monitor Drying Time: Allow each layer to dry completely before adding more. Rushing this stage can lead to cracking or weak structural integrity.
- Experiment with Textures: Don’t be afraid to experiment. Use different tools to create unique textures and patterns on your projects. This personalizes every piece.
- Sealing for Longevity: Once your projects are completed and fully dried, sealing them with a clear varnish or paint will protect them from moisture and enhance their durability.
By implementing these tips, you can elevate your crafting abilities and enjoy the process even more.
Addressing Common Challenges
Working with paper mache clay can present challenges that need to be addressed. Below are some common issues along with their solutions:
Cracking During Drying
- Causes of Cracking: Cracking in paper mache clay during the drying process is a common issue faced by many crafters. This problem usually occurs when the clay is applied in overly thick layers, which makes it difficult for moisture to escape uniformly. Additionally, if the clay dries too quickly, it can cause the outer layer to shrink faster than the inner layers, leading to cracks.
- Solutions to Prevent Cracking: To prevent cracking, it is crucial to apply thinner layers of clay. Thin applications allow for more even drying and minimize stress on the material. You can also try to control the environment in which your clay is drying. For instance, placing your project in a humid environment can help maintain moisture levels and slow down the drying process, giving the clay ample time to set without cracking.
- Monitoring Drying Conditions: Always keep an eye on the humidity levels while your paper mache clay pieces are drying. Using a humidifier in dry conditions or wrapping the clay in plastic during the initial drying phases can provide the necessary moisture to prevent cracks.
Weak or Fragile Pieces
- Understanding Weakness: If your completed project feels weak or fragile, it often points to issues with the clay mixture or the thickness of the applied layers. A weak structure may lead to pieces that easily break or chip, which can be disappointing after all the effort put into crafting.
- Ensuring Proper Mixture: To create a strong and durable clay, ensure that you achieve the right balance of ingredients in your mixture. Using too much water or not enough adhesive can compromise the structure.
- Layering Technique: It’s also essential to apply enough layers to build strength. A general rule of thumb is to aim for at least three to four solid layers, allowing each one to dry completely before applying the next. This layering technique reinforces the piece and contributes to its durability.
- Drying Time: Allow sufficient drying time between layers. Rushing this process can result in weak adhesion and structural integrity. Pay attention to the consistency of each layer you apply to ensure a well-constructed final piece.
Difficulty in Detail Work
- Challenges with Molding: If you find that your paper mache clay is difficult to mold into detailed shapes or intricate designs, it could be a sign that the clay has become too dry. Insufficient moisture can hinder your ability to work with the material effectively.
- Softening the Clay: To make the clay more workable, consider adding a small amount of water or additional glue. This can help to restore some flexibility and make it easier to manipulate the clay to achieve the desired details in your project.
- Adjusting Consistency: Continually monitor the consistency of your clay while working. If it begins to dry out and harden, take a break and rehydrate the clay, ensuring it remains soft and malleable for detailed work.
Surface Smoothness Issues
- Achieving a Smooth Finish: After allowing the clay to dry completely, you may notice that the surface isn’t as smooth as you would prefer. Rough edges or imperfections can be common when working with paper mache clay, but there are ways to address this.
- Sanding Technique: To achieve a polished look, gently sand down the dried surface using fine-grit sandpaper. This process can remove minor imperfections, bumps, and uneven areas, resulting in a more professional finish.
- Sanding Precautions: While sanding, be cautious not to apply too much pressure or sand too vigorously, as this could damage the underlying structure. Instead, use light, even strokes to gradually smooth the surface without compromising its integrity.
- Finishing Touches: After sanding, you can enhance the appearance of your piece further by applying a sealant or paint, if desired. This not only adds an aesthetic quality but also provides a layer of protection for your finished project.
Identifying and addressing these challenges can significantly enhance your crafting experience and the quality of your finished product.
Paper Mache Clay vs. Traditional Paper Mache
Crafters often wonder about the differences between paper mache clay and traditional paper mache. Here are the key distinctions:
- Composition: Traditional paper mache is typically made of layers of paper adhered with glue, creating a lightweight but firm structure. In contrast, paper mache clay combines paper with clay ingredients, allowing it to be sculpted and molded.
- Flexibility: Paper mache clay retains more flexibility, enabling artists to create intricate shapes and designs. Traditional paper mache, while sturdy, may not offer the same capabilities for detail.
- Drying Time: Both materials require drying, but paper mache clay can dry faster due to its thicker consistency. Understanding this can help manage project timelines.
- Usage: While traditional paper mache is often used for larger, hollow forms, paper mache clay is excellent for both small sculptures and larger projects. It can be used to add details and textures that traditional methods may not achieve.
Understanding these differences can help you choose the right medium for your specific project requirements.
Frequently Asked Questions
To further clarify your understanding of paper mache clay, here are some frequently asked questions:
- How do you make paper mache clay?
To make paper mache clay, tear paper into small pieces and mix them with glue and water. Blend until you achieve a smooth consistency, adding optional ingredients like flour for added texture. - Can you use clay for paper mache?
No, traditional clay is not typically used for paper mache; however, paper mache clay contains both paper and adhesive elements, allowing for sculpting and detailing. - What’s the difference between paper mache and paper clay?
Paper mache refers to the technique of applying layers of paper and adhesive, while paper clay combines these elements with clay, creating a material that retains the benefits of both mediums.
Conclusion
In conclusion, paper mache clay is a versatile and exciting medium that opens up vast possibilities for crafters in 2025. By applying the tips, techniques, and recipes discussed in this article, you can elevate your crafting skills and embark on creative projects that reflect your unique artistic vision. Whether you are making decorative items for your home or sculptural pieces as gifts, paper mache clay provides durability and detail that traditional methods may not achieve.
As you delve into this incredible crafting material, remember that experimentation and practice are key to success. Don’t hesitate to explore different techniques, textures, and styles. Embrace your creativity, and allow paper mache clay to help you bring your artistic dreams to life! Gather your materials, follow the steps outlined here, and embark on exciting crafting adventures today. Happy creating!