Introduction
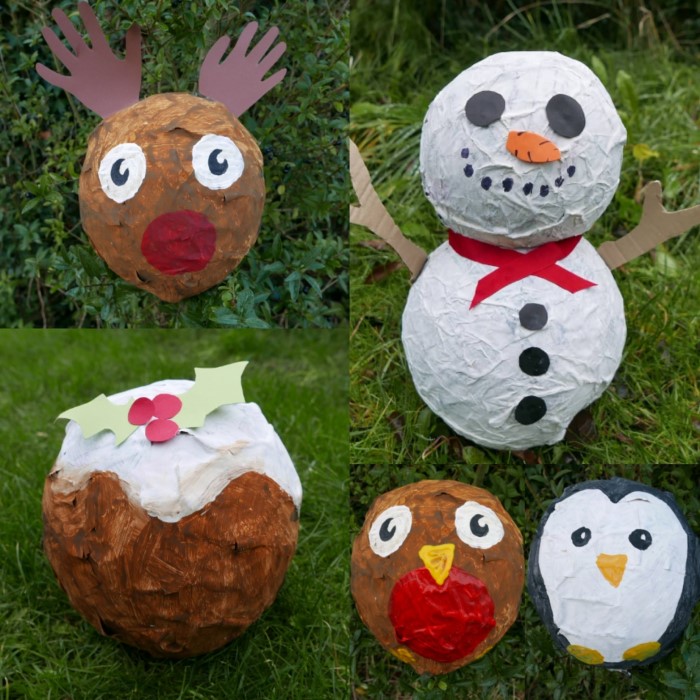
Creating festive decorations is a wonderful way to bring the family together during the holiday season. One such craft that combines creativity and fun is making paper mache Christmas ornaments. This hands-on activity not only results in beautiful ornaments for your tree but also fosters creativity and teamwork among family members. In this article, we will explore everything you need to know about making DIY paper mache Christmas ornaments, including materials, techniques, and tips to make your holiday crafting engaging and enjoyable for everyone.
What Is Paper Mache?
Paper mache, or papier-mâché, is a crafting technique that involves bonding layers of paper together using a wet adhesive, often flour-based paste or glue. This method allows you to create a multitude of shapes and structures, from decorative ornaments to sculptures. The beauty of paper mache lies in its accessibility; it is affordable and can be done using materials easily found around the home.
Benefits of Making Paper Mache Ornaments
- Creative Outlet: Crafting with paper mache allows family members to express their artistic talents while preparing for the holidays.
- Quality Time: Working on DIY projects together strengthens bonds and encourages collaboration.
- Eco-Friendly: This crafting method promotes recycling by using old newspapers and paper, making it an environmentally friendly option.
- Customizable: Each ornament can be personalized with paint, glitter, or other decorative elements, ensuring that every creation is unique.
Materials You Will Need for Paper Mache Ornaments
Before diving into the crafting process, gather the materials outlined below. Having everything on hand ensures a smooth crafting experience for you and your family.
Essential Materials

Paper
- Types of Paper: Old newspapers and magazines are ideal for this project because they are readily available and typically recyclable. You can also use any scrap paper you might have lying around, such as wrapping paper or leftover printer paper.
- Benefits of Using Paper: These materials are easy to tear into strips and are lightweight, which is critical for the structural integrity of your paper mache ornaments. The layered composition of various types of paper can enhance the texture and visual interest of your final product.
- Preparation: Before starting the project, gather a sufficient amount of paper, ensuring you have various colors or patterns if desired. This preparation will help streamline the crafting process.
Adhesive
- Types of Adhesives: You have the option to choose between a glue-and-water mixture or a flour-based paste for your paper mache project. Both types have their merits and can be used based on personal preference and availability.
- Making Flour Paste: For the flour-based paste, combine one part flour with two parts water in a bowl. Stir until the mixture is smooth and free of lumps. Adding a pinch of salt helps inhibit mold growth, which is especially important if you plan to keep your ornaments for a long time.
- Glue Mixture: If you prefer a glue mixture, dilute white school glue or craft glue with an equal amount of water. This method results in a smooth adhesive that is slightly stronger and provides good coverage for the paper strips.
Balloon or Mold
- Using Balloons: Balloons are an excellent choice for creating spherical ornaments. To use, simply inflate the balloon to your desired size and tie it securely. The balloon acts as a base, creating a hollow ornament once deflated and removed.
- Alternative Molds: If you prefer different shapes, consider using other molds, such as bowls, cookie cutters, or even custom-shaped objects from your kitchen. These molds allow for a wider variety of ornament shapes beyond just spheres.
- Preparing the Mold: Whichever mold you choose, ensure it is clean and can be easily removed once the paper mache is dry. Applying a thin layer of petroleum jelly or cooking spray can help the finished ornament release more easily.
Paint and Brushes
- Choosing the Right Paint: Acrylic paints are recommended for decorating your paper mache ornaments. They adhere well to the paper surface and are available in a wide range of colors.
- Applying Paint: Once your paper mache ornament is completely dry, use paintbrushes or sponges to apply the acrylic paint. Using multiple layers can help achieve a richer color and cover any paper patterns that may be visible underneath.
- Allowing to Dry: After painting, ensure to let the ornaments dry thoroughly before handling them to avoid smudging the design. You can set them aside in a well-ventilated area or use a drying rack.
Sealant
- Purpose of Sealant: A clear gloss sealant is a great finishing touch for your ornaments. It serves to protect the paint and paper from moisture, dust, and handling, ensuring your creations last for many seasons.
- Types of Sealant: You can opt for either a spray sealant or a brush-on kind, depending on your preference. Spray sealants provide an even coat and are easy to apply, while brush-on types give you more control.
- Application: Once your painted ornaments are fully dry, apply the sealant according to the manufacturer’s instructions. Make sure to allow it ample time to cure before displaying your ornaments.
Decorative Elements
- Adding Personal Touches: To make your paper mache ornaments truly unique, consider adding decorative elements like glitter, ribbons, or stickers. These embellishments can enhance the overall aesthetic and reflect your personal style.
- Applying Glitter: If using glitter, it’s best to apply it while the paint or sealant is still wet so that it adheres properly. Alternatively, you can sprinkle glitter on wet glue for a whimsical touch.
- Using Ribbons and Stickers: Ribbons can be attached to the top of the ornament for hanging, while stickers can provide creative patterns or holiday-themed designs. This is a wonderful way to involve everyone in the decorating process, as children can choose their favorite stickers or colors.
With the right materials ready, you can make your way to a fun crafting session.
Step-by-Step Instructions
To create stunning paper mache Christmas ornaments, follow these simple steps. Get the whole family involved and embrace the joy of crafting together!
Step 1: Prepare Your Workstation
Create a clean and spacious work area. Consider covering the table with a drop cloth or newspaper to protect the surface from spills and messes. Ensure there’s enough space for everyone to work comfortably.
Step 2: Prepare the Paper and Adhesive
Tear the paper into small strips (around 1-2 inches wide). Be sure to have plenty of pieces ready. Then, prepare your adhesive by mixing the glue with water or creating a flour-based paste using the method described earlier.
Step 3: Inflate the Balloon (For Spherical Ornaments)
If you are using a balloon, inflate it to your desired size. Tie a knot at the end and place it on a plastic cup or bowl to keep it steady while you work.
Step 4: Apply Paper Strips
- Dip each strip of paper into the adhesive, ensuring it is fully coated.
- Place the adhesive-covered strip onto the balloon, smoothing it down to eliminate air bubbles.
- Overlap the strips to create a sturdy layer.
- Continue layering until you cover the entire balloon, leaving a small section at the knot clear for later removal. Aim for at least three layers for durability.
Step 5: Allow the Ornaments to Dry
After you finish applying the paper strips, allow the ornament to dry completely. This typically takes 24 hours, but the drying time may vary based on humidity and temperature conditions. The paper should feel hard and sturdy when fully dry.
Step 6: Pop the Balloon
Once the ornament is dry, carefully pop the balloon and remove it from the hardened paper mache shell. You will find a beautiful ornament ready for decoration.
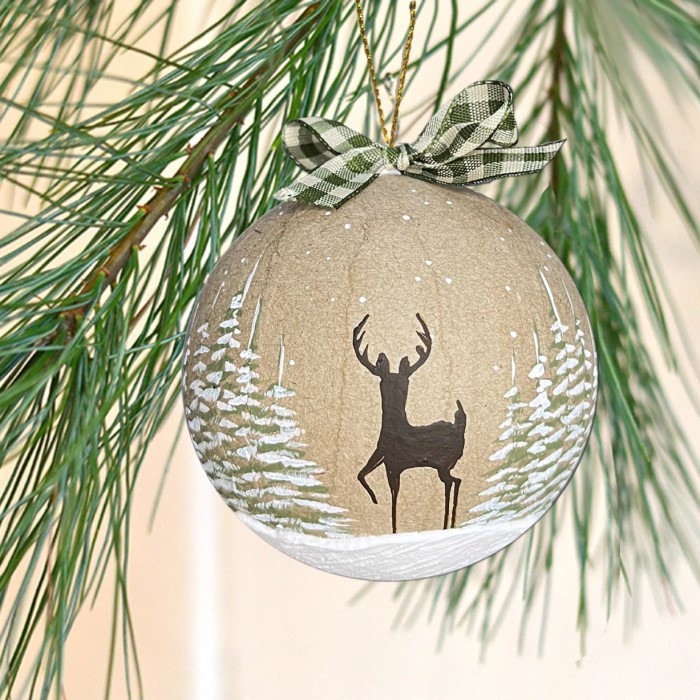
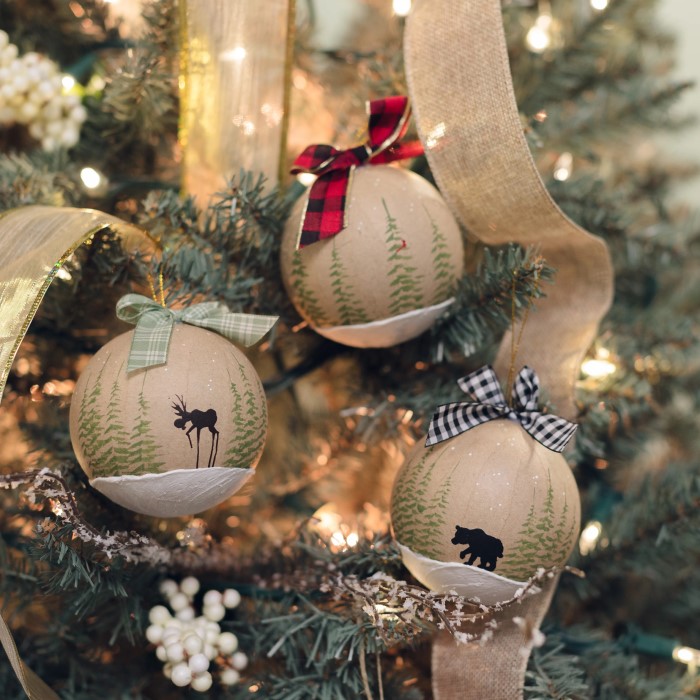
Step 7: Paint and Decorate Your Ornaments
Now comes the fun part! Use acrylic paints to add color and creativity to your ornaments. Allow the paint to dry, and finish with a sealant to ensure durability. Add ribbons, stickers, or glitter for that perfect festive touch.
Step 8: Hang Your Ornaments
Once everything is dry, use string or ribbon to create a loop at the top of each ornament. Hang your beautiful creations on your Christmas tree and enjoy the pride of your DIY project.
Tips for Successful Paper Mache Crafting
- Work in a Well-Ventilated Area: Ensure good airflow, especially if using glue-based adhesives.
- Be Patient with Drying Times: Rushing the process can lead to weak ornaments. Be patient and allow sufficient drying time.
- Experiment with Designs: Don’t be afraid to explore different shapes, colors, and embellishments. Each ornament can be a unique representation of everyone’s creativity.
FAQ
How to Make Papier-Mâché Christmas Baubles?
To make paper mache baubles, follow the steps outlined in this article using a small balloon or round mold. Inflate or shape your selected mold, apply paper strips, and decorate once dry.
Is Paper Mache with Glue or Flour Better?
Both options can work well. Glue-based paper mache often dries clearer and is less prone to mold, while flour-based paste is more affordable and easy to make. Choose based on availability and personal preference.
Why Add Vinegar to Paper Mache?
Adding vinegar to flour paste helps prevent mold growth, extending the life of your paper mache creations. This is especially useful in humid environments.
Does Paper Mache Dry Better in Heat or Cold?
Paper mache generally dries faster in warm, dry conditions. however, extreme heat may cause it to dry too quickly, leading to cracks. A moderate, warm environment is optimal for drying.
Conclusion: Embrace Family Fun with Paper Mache Ornaments
Creating paper mache Christmas ornaments can be a delightful activity for the entire family. Not only do you produce beautiful decorations for your home, but you also create cherished memories through collaboration and creativity. By following the steps outlined above and incorporating personal touches, each ornament becomes a cherished symbol of your family’s holiday spirit.
Embrace the joy of crafting this holiday season. Gather your materials, involve your family, and create stunning paper mache Christmas ornaments that you can proudly hang on your tree. Happy crafting!