Introduction
Crafting has emerged as a beloved pastime, allowing individuals to unleash their creativity and explore their artistic potential. One delightful and engaging project is creating a paper mache shark. This craft is perfect for ocean lovers, bringing joy and creativity together while also providing an educational aspect about marine life.
Paper mache offers a unique way to construct impressive and durable designs using simple materials. From large, colorful sharks displayed in children’s rooms to smaller decorative pieces, creating a paper mache shark allows you to express your artistic style in various forms. In this article, we will guide you through the steps of crafting your paper mache shark, discuss necessary materials, and explore the techniques to achieve the best results.
Understanding Paper Mache Techniques
Before diving into the crafting process, it’s essential to familiarize yourself with some fundamental paper mache techniques. Understanding these basics will help you navigate the project with ease and confidence.
What is Paper Mache?
Paper mache is a craft technique involving the use of paper pieces, typically newspaper, that are soaked in a paste made from flour and water or glue. Once dried, the layered paper hardens, creating a sturdy form that can be painted and decorated.
Basic Techniques to Master
- Preparation: This involves gathering materials and setting up your workspace. An organized environment fosters creativity and efficiency.
- Creating the Structure: You can use different structures for your shark model, such as a balloon for a 3D design or cardboard for a flat design. If using a balloon, inflate it to your desired size for the shark.
- Mixing the Paste: When creating the paste, mix equal parts flour and water until smooth, or use a ready-made paper mache glue for convenience.
- Layering: Apply strips of paper that have been dipped in paste over your structure. Overlapping the strips helps to create strength.
- Drying Process: Patience is critical. Allow each layer to dry thoroughly before adding more. A hairdryer can speed up drying but take care not to overheat it.
- Finishing Touches: After your shark is dry, use paints and other materials to add color and details. Seal your work with a varnish for a polished finish.
Step-by-Step Guide
Now that you have a grasp of the basic techniques, it’s time to dive into the step-by-step process of creating your own paper mache shark.
Step 1: Gather Your Materials
To create your paper mache shark, you will need the following materials:
- Newspaper or Similar Paper: Torn into strips for layering.
- Structure Base: A balloon, cardboard, or wire frame for shaping.
- Paper Mache Paste: This can be homemade using flour and water or premade paste.
- Paints and Brushes: For decorating your shark.
- Other Tools: Scissors, a mixing bowl, and a plastic sheet for the work surface.
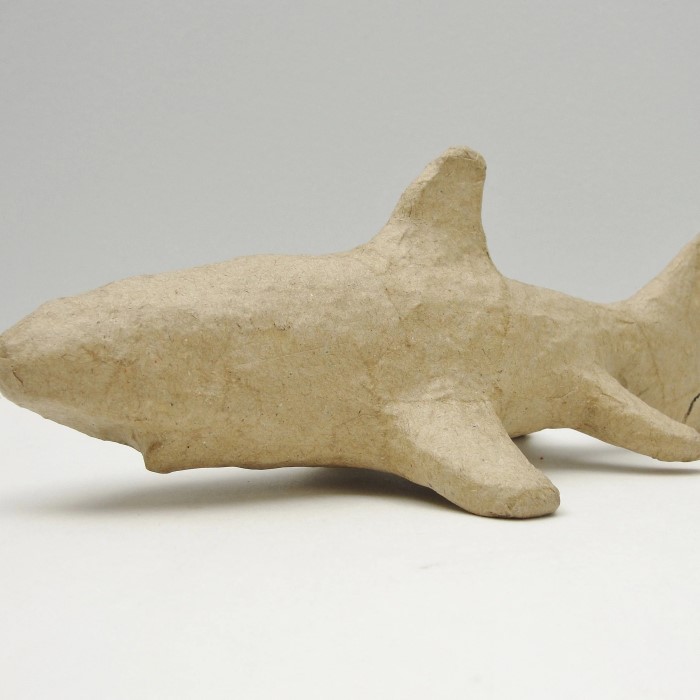
Step 2: Prepare Your Shark’s Structure
The shape of your shark largely depends on the structure you decide to use. Inflating a balloon can provide a great way to shape a realistic 3D shark. If using cardboard, create shark fins and a tail separately.
- Balloon Method: Inflate a balloon to the desired size and tie it off. This will be the base for the shark body.
- Cardboard Method: Cut out the shapes of a shark’s body, fins, and tail using sturdy cardboard. Use tape or glue to assemble them into shape.
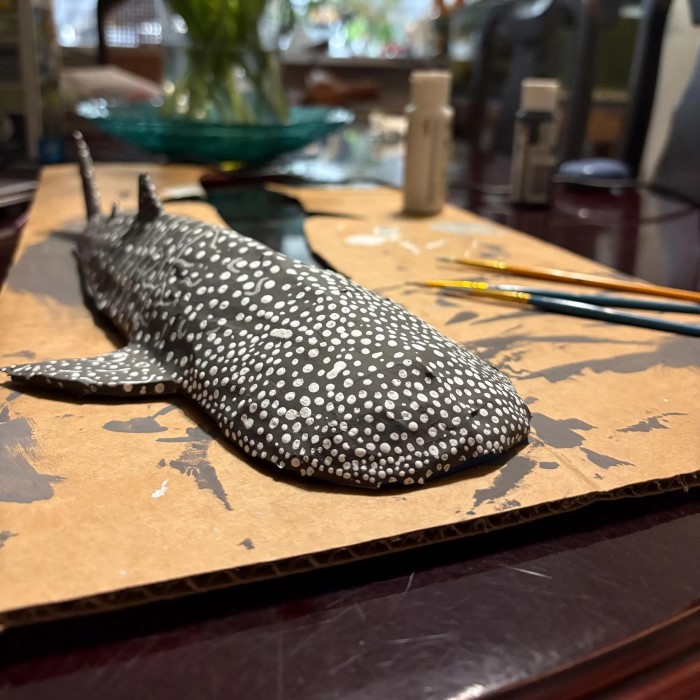
Step 3: Apply the Paper Mache Layers
Now it’s time to apply the paper mache. Dip each strip of paper into the paste, ensuring it’s evenly coated, and then lay it over your structure.
- Technique Tip: Start from the bottom and work your way up. Overlapping strips provides strength and minimizes gaps.
- Layering: For best results, add at least three to four layers. Remember to let each layer dry completely before adding the next.
Step 4: Allow the Shark to Dry
Once you have built up the necessary layers, it’s crucial to allow your shark to dry thoroughly. Depending on the humidity level and thickness, this can take anywhere from 24 hours to a few days.
- Drying Environment: Ensure your shark is in a well-ventilated area to speed up the drying process. Avoid placing it in direct sunlight as this can cause cracking.
Step 5: Decorating Your Paper Mache Shark
After the drying process, your shark is ready for decoration. This step allows you to unleash your creativity even further.
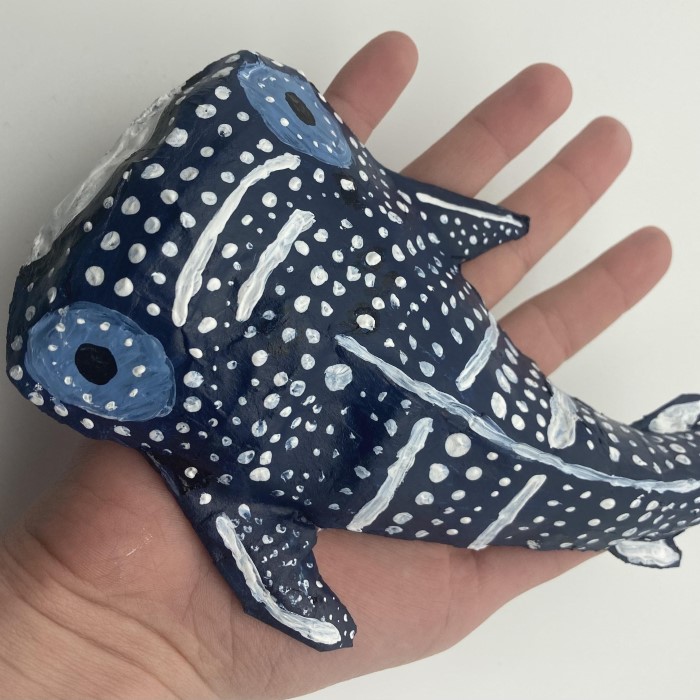
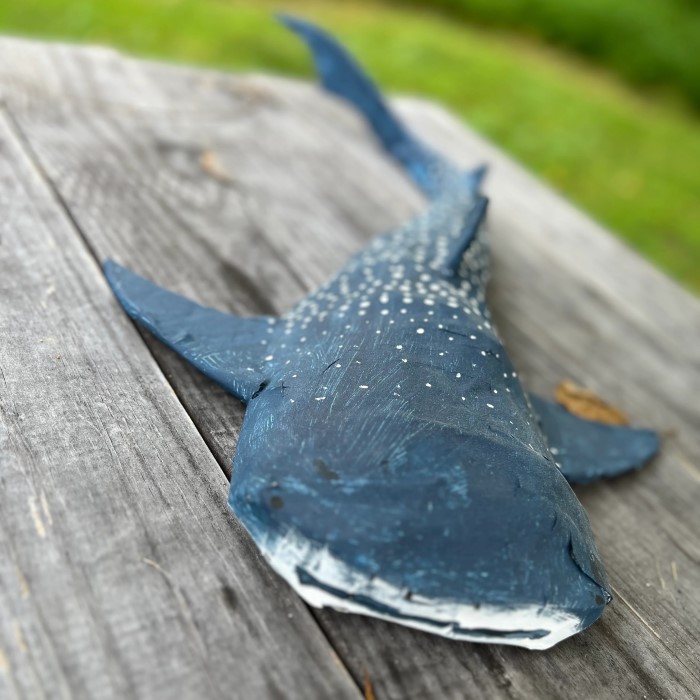
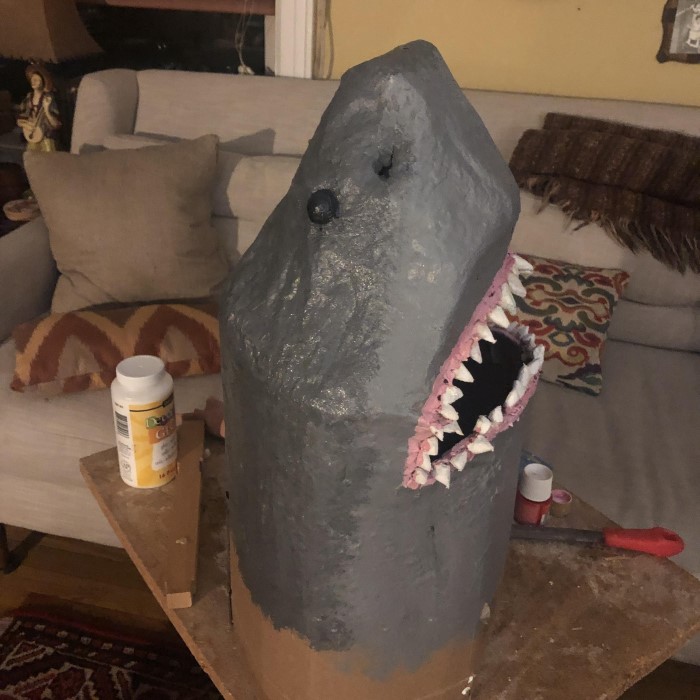
- Using Paint: Use acrylic or tempera paints to add color. Many choose a realistic approach, painting gray for the body and white for the belly. Others may prefer bright colors for a more whimsical design.
- Add Details: Consider adding fangs, googly eyes, or fins using additional paper or fabric for a fun touch. This not only enhances the shark’s appearance but showcases your artistic style.
Step 6: The Final Touches
Before displaying your shark, consider applying a sealant or varnish for durability. This is especially important if the shark is going to be displayed outdoors or in a humid environment.
- Sealant Application: Apply a thin coat of craft varnish with a clean brush. This protects your creation from moisture and wear while giving it a nice finish.
Benefits of Crafting
Engaging in the crafting of a paper mache shark brings numerous benefits:
Enhances Creativity
- Encouraging Personal Expression: This crafting project offers a unique platform for individuals to explore their artistic side. By designing your paper mache shark, you can choose colors, shapes, and patterns that reflect your personal style.
- Endless Design Options: The possibilities for your shark design are virtually limitless. You can create a realistic representation of a shark or take a more whimsical approach, such as using bright colors or fun embellishments.
- Experimentation: As you work on your shark, you will experiment with different techniques and materials. This encourages innovative thinking and allows for the discovery of new methods of crafting that can lead to unique results.
Develops Fine Motor Skills
- Tearing Paper: The process of tearing paper into strips requires precise hand movements and control, enhancing coordination.
- Dipping and Layering: Dipping paper strips into the glue or paste and layering them on the structure involves various hand motions that significantly improve dexterity.
- Attention to Detail: As you apply the strips carefully and ensure they overlap properly, you develop a sharper focus and better hand-eye coordination.
Stress Relief
- Mindfulness and Focus: Engaging in a crafting activity allows you to zone out from daily stressors. This focused creative task promotes mindfulness, helping you stay present in the moment.
- Expressing Emotions: Crafting provides an avenue for emotional expression. Putting creativity into action can be cathartic and help alleviate feelings of anxiety or tension.
- Sense of Accomplishment: Completing a project like a paper mache shark fosters a sense of achievement. This positive reinforcement can boost your mood and contribute to overall well-being.
Educational Value
- Learning About Marine Life: While working on your paper mache shark, you’ll likely research different species of sharks and their traits. This can boost your knowledge of marine biology.
- Environment Awareness: Through this project, you can learn about the importance of ocean ecosystems and the challenges facing marine life. This knowledge can foster a deeper appreciation for conservation efforts.
- Integration with Curriculum: Teachers can incorporate this craft into educational settings, linking it with lessons on marine habitats, biology, and environmental science, enriching students’ learning experiences.
Family Bonding
- Shared Experience: Crafting a paper mache shark can be a fun family activity where everyone participates, regardless of age or skill level. Working together can help build connections among family members.
- Encouraging Communication: As family members collaborate on the project, they engage in conversations about their ideas and preferences. This type of interaction nurtures relationships and enhances family communication.
- Creating Lasting Memories: Completing a project as a family leads to shared memories that strengthen bonds. The finished paper mache shark can serve as a reminder of the enjoyable time spent together.
FAQs
Does water destroy paper mache?
Excessive water can weaken paper mache if it is not properly sealed after drying. Keeping your finished craft out of direct water exposure is crucial for durability.
What are the Mexican paper mache creatures?
In Mexico, vibrant paper mache creatures often feature in festivals. They symbolize celebration and are frequently crafted as piñatas, adding lively decor to parties.
How to make a white shark?
To create a white shark, you can start by painting the base gray and then carefully applying a layer of white paint for the underbelly. Add blue accents for a playful twist.
Conclusion
In conclusion, creating a paper mache shark is a fun and engaging activity for anyone who loves art and the ocean. With the simple steps outlined in this guide, you can craft a stunning piece that reflects your personality and love for marine life.
Whether you’re making a shark for educational purposes, home décor, or artistic expression, each crafted piece tells a story about creativity and exploration. So gather your materials, and let your imagination swim free as you embark on your paper mache journey.
Get ready to dive into this exciting project and enjoy the beautiful craft of creating your very own paper mache shark. Happy crafting!