Introduction to Paper Mache
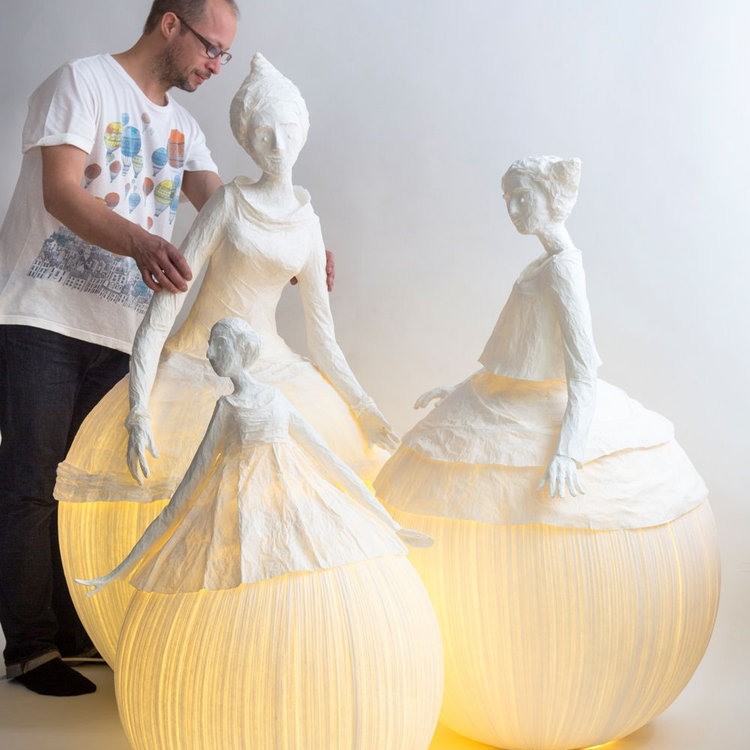
Paper mache is a popular craft technique that is both versatile and fun. It allows artists and hobbyists to create unique 3D sculptures using simple materials. Layers of paper and adhesive are combined to form durable and creative structures. This paper mache sculpture of technique is ideal for beginners and professionals alike due to its simplicity.
What is Paper Mache?
Paper mache, also known as papier-m?ché, translates to “chewed paper” in French. It involves molding and hardening pieces of paper with glue or paste. Once dried, the finished structure becomes sturdy and can be further refined. Paper mache is widely used in crafts to create masks, sculptures, and decorative items. It is budget-friendly, environmentally friendly, and easy to work with.
Historical Background and Popularity
The origins of paper mache date back centuries, with early use in China and Persia. In China, paper mache was used to create ritual objects and helmets. It later gained popularity in Europe during the 17th century. Artists created decorative furniture, theater props, and intricate designs using the technique. Today, paper mache remains a mainstream art form due to its accessibility and creative potential. It is widely taught in schools and used for artistic expression.
Essential Materials and Tools
To create stunning paper mache sculptures, you need the right materials and tools. These items help ensure your craft is smooth, sturdy, and visually appealing.
Types of Paper for Paper Mache
Choosing the right paper is key to your paper mache projects. Common types include:
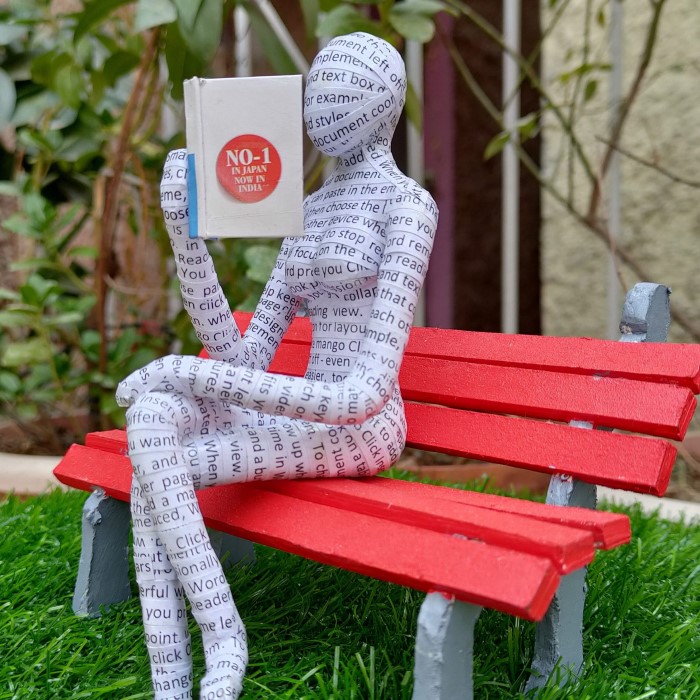
- Newspaper: Affordable and widely used for basic sculpting and layering.
- Tissue paper: Ideal for adding finer details or lightweight designs.
- Brown craft paper: Provides excellent durability for larger sculptures.
- Scrap paper: Good for recycling and base layers.
Ensure the paper tears easily to soak glue well for effective layering.
Adhesives and Pastes
Adhesives bond the paper layers and harden the sculpture. Popular options include:
- Flour and water glue: Budget-friendly, simple, and non-toxic for beginners and kids.
- PVA glue: Provides strong adhesion and faster drying for detailed work.
- Wallpaper paste: Perfect for larger projects due to its thick consistency.
- Commercial craft paste: Offers convenience and consistent results.
Use clean water to thin adhesives for smoother application.
Sculpting Tools and Accessories
Tools and accessories make shaping and refining sculptures easier. Useful items include:
- Brushes: Apply glue evenly and paint designs later.
- Scissors: Cut and trim paper to desired sizes and shapes.
- Rolling pins: Flatten paper layers or smooth sections.
- Spatulas: Excellent for spreading thick adhesive or molding surfaces.
- Bowls: Mix pastes and hold materials while working.
Optional tools like sandpaper or knives can refine finishes and edges. Prioritize safety and comfort while selecting tools.
By gathering these materials, you can start crafting beautiful paper mache sculptures confidently.
Preparing Your Workspace
Setting up an efficient workspace is essential for successful paper mache sculpture projects. A well-organized and safe environment enhances creativity and ensures a smooth crafting process.
Setting Up a Creative Environment
- Choose a Dedicated Area: Select a workspace with enough room for materials and movement. Avoid congested areas.
- Protect Surfaces: Cover tables and floors with plastic sheets or newspapers to prevent glue and paint spills.
- Bright Lighting: Ensure the area is well-lit for precision and clear visibility during sculpting.
- Material Storage: Arrange papers, adhesives, and tools within easy reach to save time while working.
- Ventilation: Maintain good airflow to avoid glue odors and provide a comfortable crafting space.
- Comfortable Seating: Use ergonomic seating to reduce strain during long crafting sessions.
Organizing your workspace supports focus and creativity. It helps you enjoy the sculpting process fully.
Safety Tips and Precautions
Wear Protective Gear
- Use of Gloves: Always wear gloves when handling glue or paste. This simple step protects your hands from potential irritation and allergic reactions caused by chemicals in adhesives.
- Choosing the Right Gloves: Opt for disposable nitrile or latex gloves, which provide flexibility and comfort while preventing direct contact with harmful substances.
- Long-Sleeved Clothing: Consider wearing long sleeves or an apron as additional protection against splashes and drips, particularly when working with messy materials.
- Eye Protection: If you’re working with materials that could splatter or if you’re using sharp tools, it’s also wise to wear safety goggles to protect your eyes from potential hazards.
Safe Tools
- Selecting the Right Tools: Choose crafting tools that have rounded edges and soft grips to ensure safety during use. This reduces the chances of accidental cuts or injuries.
- Quality Equipment: Invest in high-quality scissors, craft knives, and other tools that meet safety standards. Ensure they are well-maintained to function effectively without the risk of malfunction.
- Ergonomic Design: Look for tools designed for safety and comfort, as this will make your crafting process more enjoyable and reduce hand fatigue.
- Proper Storage: After use, store tools in a designated area away from children’s reach. This helps prevent accidental injuries and keeps your workspace organized.
Avoid Overexposure
- Working in Intervals: Plan to work in short intervals rather than long, continuous sessions. This practice helps minimize your exposure to glue and paste fumes, which can be harmful over time.
- Ventilated Workspace: Ensure your crafting area is well-ventilated. Open windows or use fans to circulate fresh air and disperse any fumes produced by adhesives.
- Taking Breaks: Schedule regular breaks to step away from your work area and reset your lungs. This break not only protects your health but can also provide a fresh perspective on your project.
- Using Low-Fume Products: Whenever possible, select low-fume or non-toxic adhesives and paints that are safer for prolonged use. This choice enhances your safety while crafting.
Clean Spillages
- Immediate Action: Act quickly when you notice any adhesive or paint spills. Wiping up spills immediately prevents slippery surfaces that could lead to accidents and injuries.
- Use Appropriate Cleaning Supplies: Keep paper towels or clean rags handy to easily absorb spills. Consider using a safe cleaning solution for more stubborn adhesive residues.
- Placement of Tools and Materials: Organize your workspace to minimize the chances of spills. Keep glue, paints, and brushes in designated areas to reduce clutter and accidental knockovers.
- Protecting Surfaces: Lay down a drop cloth or old newspapers on your crafting surface to catch any drips and spills. This protective layer simplifies cleanup and keeps your workspace tidy.
Keep Food Away
- Designated Eating Areas: Establish dedicated areas for eating and drinking far from your crafting space. This practice helps maintain cleanliness and reduces the risk of ingesting harmful substances.
- Wash Hands Regularly: Emphasize the importance of washing hands after crafting sessions and before handling food. This step ensures that any residual glue or paint is removed.
- Child Safety: Educate children about the importance of eating away from crafting materials. This guidance not only teaches hygiene but also fosters awareness of their environment.
- Storing Food Properly: If you are working on a project for an extended period, keep food storage sealed and away from your working area to prevent contamination and maintain safety.
Supervise Children
- Active Monitoring: Always supervise children during crafting activities, particularly those involving potentially hazardous materials like glue, sharp tools, or paint. This oversight ensures their safety while they engage in creative activities.
- Demonstrating Safety: Take the time to demonstrate the correct usage of tools and materials. Show them how to handle scissors and adhesives safely, reinforcing proper techniques to avoid accidents.
- Encouraging Safe Practices: Encourage children to ask questions if they are unsure about a tool or material. Open communication helps build a safe crafting environment.
- Setting Clear Boundaries: Establish rules regarding allowed areas, materials, and tools before starting the project. Setting these boundaries helps children understand safety protocols and fosters responsible crafting habits.
Following these safety measures keeps your crafting environment hazard-free. It allows you to work with confidence and peace of mind.
Basic Techniques for Paper Mache Sculpting
Learning basic paper mache techniques ensures strong and visually appealing sculptures. These methods form the foundation for any creative project.
Layering and Molding
- Prepare Paper Strips: Tear paper into strips for easy application.
- Apply Adhesive: Dip each strip into glue, removing excess paste to avoid lumps.
- Build Layers: Place strips one by one over the base structure. Smooth them to remove air bubbles.
- Allow Drying: After 2-3 layers, let the piece dry fully before adding more layers.
Layering creates a strong surface while molding helps achieve the desired shape. Always work patiently for the best results.
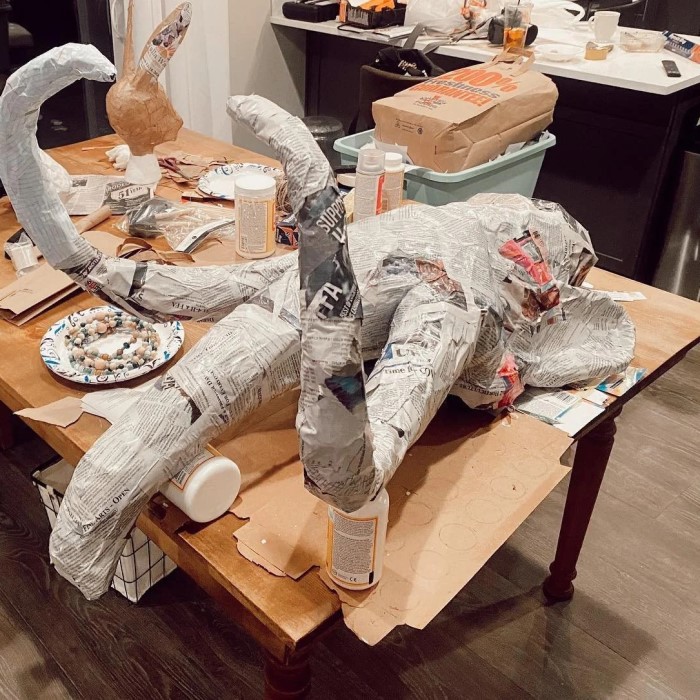
Using Armatures to Shape Sculptures
Armatures act as the internal framework for paper mache. They help support and define shapes.
- Choose a Base: Use wire, balloons, cardboard, or recycled materials for structure.
- Build a Frame: Shape your armature to match the desired sculpture form.
- Cover with Layers: Apply paper mache strips over the armature, smoothing as you go.
- Strengthen the Structure: Add more layers after drying to ensure durability.
Armatures are essential for creating larger or complex sculptures. They let you craft detailed designs.
Tips for Achieving Smooth Surfaces
- Use Fine Paper: Switch to tissue or thin paper for the final layers.
- Sand After Drying: Gently sand dry surfaces to smooth out bumps and rough spots.
- Apply Thin Layers: Avoid thick adhesive layers to prevent uneven finishes.
- Add Final Coatings: Use a diluted glue layer for a neat, shiny surface.
Smooth surfaces enhance the sculpture’s appearance and make decorating easier. Pay attention to details for a professional look.
Creative Techniques for Advanced Sculptures
For seasoned paper mache artists, advanced techniques add depth and sophistication to your creations. These methods build upon basic skills, allowing you to craft detailed, vibrant, and professional-looking sculptures.
Adding Texture and Details
Enhancing texture transforms ordinary sculptures into lifelike masterpieces. Finer details captivate attention and add character to your work.
- Embossed Patterns: Layer crumpled tissue or textured paper for raised decorative designs.
- Carving: Gently etch dried paper mache surfaces to create intricate lines or patterns.
- Mixed Media: Incorporate materials like fabric, yarn, or foil for unique textures.
- Modeling Clay Additions: Attach lightweight clay to add dimensional details like facial features or ornaments.
Experiment with techniques to discover versatile possibilities. Let creativity guide your choices!
Painting and Decorating Your Sculpture
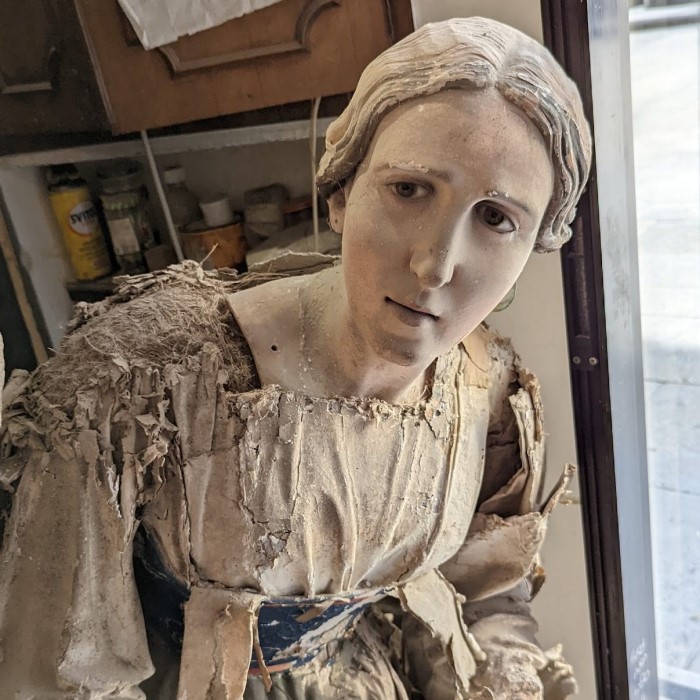
Painting and finishing are essential to bring your paper mache to life. Vibrant colors or subtle tones can set the mood.
- Priming: Apply a base coat of white acrylic paint for smooth, even color application.
- Layering Colors: Use multiple paint layers to create depth. Blend colors for gradient effects.
- Detailing: Use fine brushes to highlight details, patterns, or designs.
- Sealing: Finish with a clear varnish or glossy sealer for protection and a polished look.
Additionally, embellishments like glitter, beads, or sequins can enhance your design further. Be bold and expressive.
Combining Paper Mache with Other Materials
Blending paper mache with other materials opens new creative opportunities. Mixed media sculptures stand out for their uniqueness and flair.
- Wood or Metal Frames: Use robust frames to make large and durable sculptures.
- Plastics & Recycled Items: Reuse bottles or containers as bases for eco-friendly designs.
- Fabric: Drape cloth over damp structures for textured drapery effects.
- Wire Details: Add wire elements for structural accents or fine, intricate shapes.
By diversifying materials, your paper mache sculpture gain complexity, function, and aesthetic appeal. Experiment with combinations and let imagination lead your projects.
Troubleshooting Common Issues
Even with careful crafting, paper mache sculpture can face common challenges. Knowing how to fix these issues ensures your projects turn out well. Below are tips to overcome cracks, weak spots, and warping effectively.
Fixing Cracks and Weak Spots
Cracks and weak spots can appear during or after drying. Here’s how to fix them:
- Identify Problem Areas: Inspect your sculpture for visible cracks or unstable sections.
- Reapply Paper Layers: Add fresh paper strips soaked in adhesive over cracks or weak spots. Smooth them out.
- Use Thick Paste: For deep cracks, mix a thicker paste with flour and water. Apply it directly.
- Sand and Refine: Once dried, gently sand repaired areas for a seamless finish.
- Prevent Cracks: Avoid using overly thick layers of paper or adhesive to reduce stress during drying.
These simple fixes give your sculpture a sturdy structure and polished appearance.
Preventing Warping During Drying
Warping happens if the sculpture dries unevenly. These tips help you avoid this issue:
- Dry Slowly: Dry your sculpture at room temperature to prevent rapid moisture loss.
- Use Balanced Layers: Apply paper strips evenly across the sculpture for consistent drying.
- Rotate Regularly: Turn your sculpture often to allow all sides to dry evenly.
- Avoid Direct Sunlight: Keep your sculpture away from heat sources that cause uneven drying.
- Use a Support Structure: Place armatures or supports to hold the sculpture in shape while drying.
Taking these precautions ensures your paper mache sculpture maintains its intended form. By addressing cracks and warping properly, you’ll create durable and eye-catching designs.
Inspirational Projects and Ideas
Exploring different paper mache projects can spark creativity and inspire your designs. From beginner-friendly themes to intricate applications, the possibilities are endless.
Popular Themes for Paper Mache Sculpture
- Animal Sculptures: Create lifelike or whimsical animals. Popular choices include birds, elephants, and turtles.
- Masks: Design decorative masks for theater, parties, or festivals. Add bold patterns and colors.
- Fantasy Creatures: Bring dragons, unicorns, or mythical beasts to life with creative shapes and textures.
- Seasonal Decorations: Craft ornaments for holidays like Christmas, Halloween, or Easter. These make excellent decor.
- Nature-Inspired Designs: Sculpt flowers, trees, or fruits for a natural and calming aesthetic.
- Abstract Art: Experiment with shapes and forms for modern, eye-catching sculptures.
These themes provide a fun starting point for any paper mache project.
Showcasing Unique Designs and Applications
- Functional Art: Create items like bowls, vases, or lampshades. Combine style with practicality.
- Wall Hangings: Design 3D murals or reliefs for unique wall decor.
- Costumes and Props: Use paper mache for custom headpieces, armor, or accessories for events.
- Upcycled Art: Transform recycled objects, such as bottles or cardboard, into creative paper mache sculpture.
- Large Displays: Build larger installations or sculptures for exhibitions, events, or public art.
- Themed Collections: Develop related pieces, like a series of animals, to tell a visual story.
By exploring diverse applications, you can craft extraordinary paper mache sculpture. Let your imagination guide your creations.
Conclusion
Embarking on your paper mache sculpture journey opens a world of creative possibilities. Using simple materials, you can explore various techniques to create unique art pieces. Whether you engage in this hobby for personal expression, DIY projects, or teaching artistic skills, the exploration of paper mache will enhance your artistic capabilities.
Incorporating the mentioned techniques, materials, and project ideas will facilitate a seamless crafting experience. Remember, the only limitation is your imagination! Dive into the captivating world of paper mache sculpture today and let your creativity shine!