Introduction to Paper Mache Butterfly Crafting
Crafting with paper mache is a delightful way to express creativity. One of the most vibrant and inspiring projects you can undertake is the paper mache butterfly. This eco-friendly art form allows individuals of all ages to engage in a meaningful activity while embracing sustainability. With simple materials, vibrant colors, and a bit of imagination, creating a paper mache butterfly can transform your artistic skills while contributing to environmental consciousness.

The process of making a paper mache butterfly is not only about creating a beautiful piece of art; it also serves as an opportunity for learning and development. Through this craft, participants enhance their fine motor skills, foster creativity, and develop patience. Whether you are a seasoned crafter or a beginner, this guide will provide you with everything you need to know about making your own stunning paper mache butterfly.
What is Paper Mache?
Before diving into the craft, it is essential to understand what paper mache is. Paper mache, meaning “mashed paper” in French, refers to a composite material made from paper, adhesive, and sometimes additional elements like flour or water. This versatile medium is commonly used for creating decorative objects, sculptures, and various art projects.
The beauty of paper mache lies in its sustainability. Since it primarily uses recycled materials such as newspapers and cardboard, it effectively minimizes waste. Artists can create beautiful works of art that are both visually appealing and environmentally friendly. Moreover, the affordability of materials makes it accessible for everyone.
Materials Needed for a Paper Mache Butterfly
To create a stunning paper mache butterfly, gather the following materials:
Newspaper or Recycled Paper
- Base Material: Newspaper or recycled paper serves as the primary ingredient for your paper mache project. The fibrous nature of these materials allows them to absorb glue and mold easily.
- Eco-Friendly Choice: Choosing recycled paper promotes sustainability. It helps reduce waste in landfills and decreases the need for new paper production, making it a more environmentally friendly option. Additionally, using newspaper can add a unique texture to your finished product.
Flour and Water
- Adhesive Mixture: The combination of flour and water acts as the adhesive that binds the paper strips together in your paper mache project. This paste is key to ensuring that the layers adhere properly.
- Typical Ratio: A common ratio for this mixture is two parts flour to one part water, creating a thick, workable paste. Adjust the mixture for preferred consistency; you may add more water if it’s too thick or more flour if it’s too runny. Allow it to rest for a few minutes to enhance its adhesive properties.
Balloons or a Wire Frame
- Foundation for Shaping: Using a balloon provides a simple way to create a rounded shape for your paper mache butterfly. Once covered in paper mache, it forms a sturdy outer shell.
- Alternative Method: Alternatively, a wire frame can be used to create different shapes and structures. This method allows for more detailed designs and can result in a sturdier finished piece. A wire frame can also facilitate creating wings that have more dimension and flexibility.
Paint and Brushes
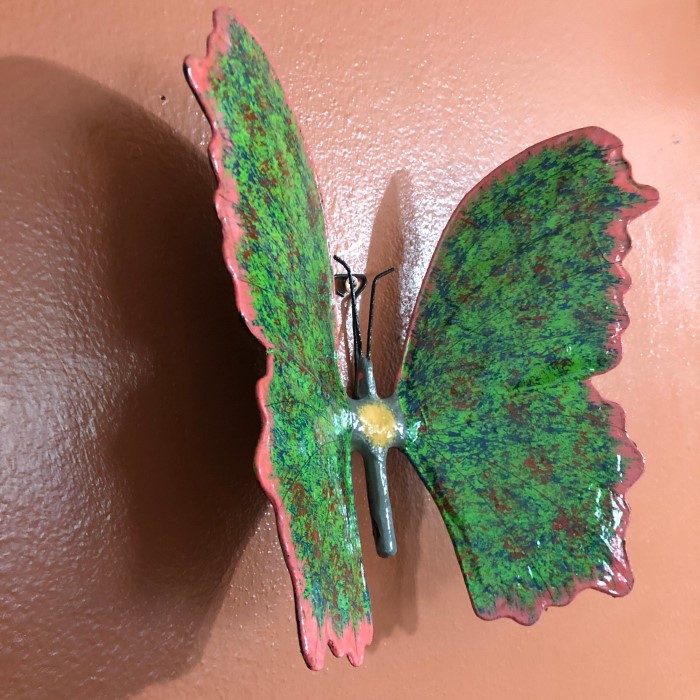
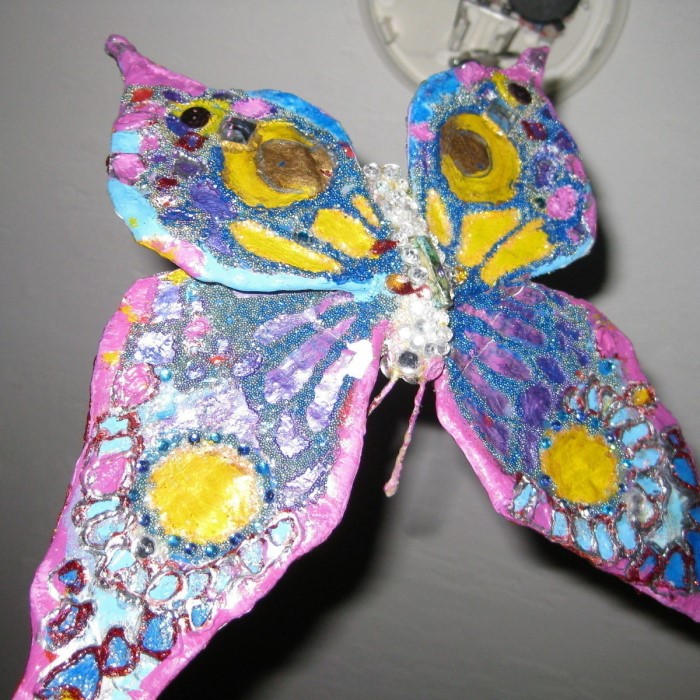
- Decorative Elements: Once your paper mache butterfly is completely dried and sturdy, it’s time to decorate. Choose bright, vibrant paints to bring your butterfly to life, enhancing its visual appeal.
- Recommended Paints: Acrylic paints are often preferred because they adhere well to paper mache and provide excellent color payoff. They also dry quickly, allowing for faster completion of your project. Consider adding embellishments like glitter or markers for added detail.
Scissors
- Essential Tool: A pair of scissors is necessary for cutting your newspaper or recycled paper into strips. The size and shape of the strips can influence the texture and appearance of your final piece.
- Cutting Techniques: When cutting, aim for strips that are roughly 1 to 2 inches wide. This size is manageable for dipping in paste and applying to your base evenly. Having scissors on hand also allows for easy modifications to your butterfly shape during construction.
Mixing Bowl
- Preparation of Paste: A mixing bowl is essential for combining the flour and water to create your adhesive paste. It should be large enough to hold all the ingredients and allow for thorough mixing.
- Cleanup and Storage: After completing your paper mache, the bowl can be easily cleaned with water. If you have leftover paste, store it in an airtight container in the refrigerator for a few days for future use.
Plastic Tablecloth or Old Newspaper
- Workspace Protection: Covering your work area with a plastic tablecloth or old newspaper is crucial for protecting surfaces from glue, paint, and mess associated with the crafting process.
- Easy Cleanup: Using a protective covering makes cleanup much simpler. Once you’ve finished your project, you can quickly dispose of or wash the tablecloth/newspapers, leaving your crafting space tidy and ready for your next creative endeavor.

Steps to Create Your Paper Mache Butterfly
1. Prepare Your Workspace
Start by covering your workspace with a plastic tablecloth or newspaper. This not only facilitates cleanup but also protects surfaces from paint and messes.
2. Make the Paper Mache Paste
In a mixing bowl, combine two parts flour with one part water. Mix thoroughly until there are no lumps. The paste should have a thick, smooth consistency similar to that of pancake batter.
3. Prepare the Base
If you’re using a balloon, inflate it to your desired size. For a wire frame, mold the wire into a butterfly shape. This frame will help give your butterfly structure.
4. Tear Strips of Paper
Tear your newspaper or recycled paper into strips, about 1 to 2 inches wide. This will make it easier to layer the paper onto your base.
5. Apply Paper Mache Layers
Dip each strip of paper into the paste, ensuring it is fully coated. Apply the paper strips to your balloon or wire frame. Overlap the strips and continue until the entire surface is covered. Depending on the size, two to three layers are usually sufficient for sturdiness. Once finished, allow it to dry completely, preferably overnight.
6. Cut and Shape Your Butterfly
After your base is dry, use scissors to carefully cut the balloon or frame. For a balloon, peel it away from the paper mache. For a wire frame, gently remove the wire.
7. Decorate Your Butterfly
Now comes the fun part! Use paints to decorate your butterfly in vibrant colors and intricate designs. Feel free to be creative—add patterns, glitter, or even sequins for a unique touch.
8. Seal Your Creation
Once the paint has dried, consider applying a clear sealant to protect your artwork. A sealant will ensure your paper mache butterfly stays intact, especially if it will be displayed outdoors.
The Environmental Impact of Paper Mache Crafts
Engaging in paper mache butterfly crafts is an excellent way to promote eco-friendly art. By utilizing recycled materials, you reduce waste and contribute to a sustainable practice. Furthermore, crafting encourages mindfulness and creativity, offering individuals an escape from the digital world. Research shows that hands-on creative activities can significantly enhance well-being and serve as a form of stress relief.
Incorporating sustainable practices into hobbies can inspire future generations to appreciate and protect the environment. When children and adults create art from recycled materials, they learn the value of sustainability and creativity.
Frequently Asked Questions (FAQ)
How to make a simple butterfly on paper?
To make a simple butterfly on paper, fold a piece of paper in half. Draw half of a butterfly with one wing slightly extending beyond the fold. Cut along the outline, then unfold to reveal a symmetrical butterfly. Decorate it with crayons, markers, or paints for added creativity.
How to make a paper mache balloon?
Making a paper mache balloon is similar to creating any other paper mache object. Inflate a balloon to your desired size, cover it with paper strips dipped in paste, and let dry. Once dry, pop the balloon to reveal a hollow paper mache shape, which can be decorated as desired.
What’s the difference between paper mache and origami?
The primary difference between paper mache and origami lies in their techniques and materials. Paper mache involves layering paper with adhesive to create three-dimensional objects, while origami focuses on folding a single sheet of paper into various shapes and forms without cutting or using glue.
What are the 5 steps to paper mache?
- Prepare your workspace and gather materials: paper, paste, and a base.
- Combine flour and water to create your paste.
- Tear paper into strips and dip them into the paste.
- Apply the coated strips to your base, overlapping them.
- Allow the layers to dry, then paint and decorate your creation.
Conclusion: Embrace Eco-Friendly Art with Paper Mache Butterflies
The paper mache butterfly craft is a joyful and eco-friendly way to create art that inspires creativity and mindfulness. With just a few simple materials and steps, individuals of all ages can engage in an enjoyable activity that promotes sustainability. Not only do these crafts allow for self-expression, but they also provide valuable lessons about reusing materials and the importance of caring for our environment.
So gather your supplies, invite your friends or family, and embark on this delightful artistic journey. The resulting paper mache butterflies will serve as beautiful decorations, reminding you of the joy of crafting and the importance of eco-friendly practices.