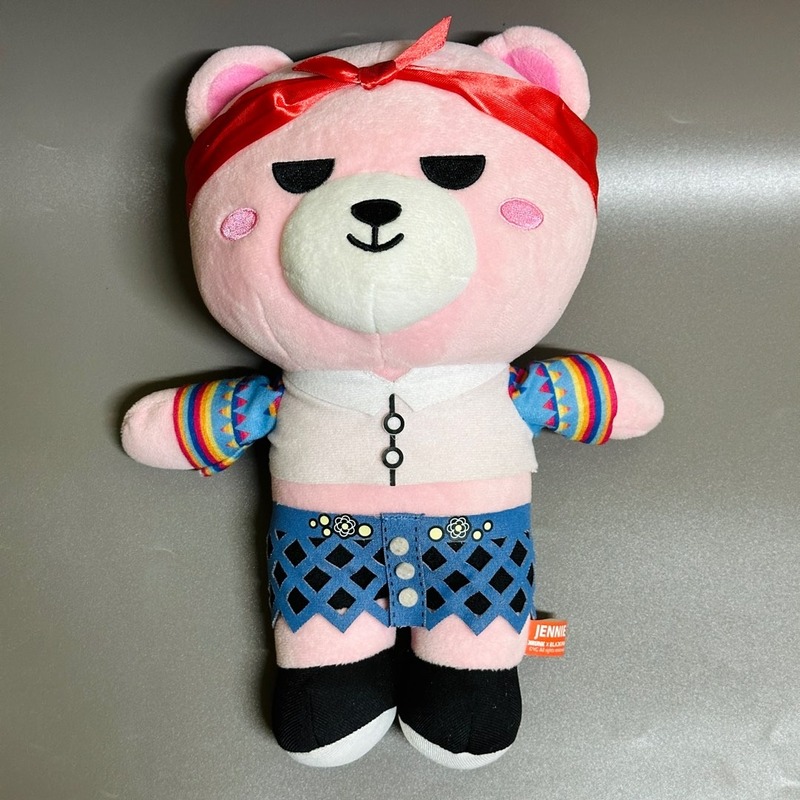
Essential Materials and Tools for Creating a Jennie Plush
Before you begin crafting your very own Jennie plush, ensure you have all the necessary materials and tools on hand. Here’s what you’ll need for your DIY project:
- Fabric: Choose a soft, durable fabric like fleece or minky for the body of your Jennie plush. These fabrics are easy to work with and comfortable to cuddle.
- Stuffing: High-quality polyester fiberfill is the best option for stuffing your plushie. It gives a nice, soft feel and retains shape over time.
- Needle and Thread: A sturdy needle and strong thread are crucial for sewing pieces together. Opt for thread color that matches your fabric to make the stitches less visible.
- Scissors: A sharp pair of fabric scissors will make cutting patterns much easier and more precise.
- Pattern: You can create your own Jennie plush pattern or find one online. Make sure it’s easy to follow and suits the size of plush toy you want to make.
- Sewing Machine (optional): For those who are skilled with a sewing machine, it can speed up the process significantly.
- Embroidery Thread: If you’re planning to add facial features or other details, embroidery thread will come in handy. Select colors that will make your Jennie plush’s features pop.
- Fabric Markers or Paint (optional): These are great for adding intricate details or unique designs to your plush.
- Measuring Tape: To ensure accuracy when following patterns, a measuring tape will be one of your most used tools.
- Pins: Pins help hold fabric pieces together before sewing, which is essential for keeping everything aligned.
Gather these items before you get started, and you’ll be well on your way to creating a charming Jennie plush. Next, we will dive into the step-by-step guide to crafting your plush doll.
Step-by-Step Guide to Making a Jennie Plush Doll
Creating your own Jennie plush doll is an engaging project that can be completed with a few simple steps. Whether you’re a beginner or an experienced crafter, this guide will help you bring a lovely Jennie plush to life! Follow these steps, and soon you’ll have a plushie to call your own.
Step 1: Prepare the Pattern
Find or draw a Jennie plush pattern. Cut out each piece from the pattern paper. Pin the paper patterns to your fabric, ensuring they’re secure before you cut.
Step 2: Cut the Fabric
Using your fabric scissors, carefully cut around the pattern pieces on your fabric. Remember, precision is key to get the best shape for your plush.
Step 3: Sew the Pieces
Start sewing the pieces together, inside out. Use your needle and thread or sewing machine. Remember to leave a gap for stuffing.
Step 4: Add Stuffing
Turn the plush right-side out. Stuff your Jennie plush with fiberfill until it’s soft but firm. Make sure to distribute the stuffing evenly.
Step 5: Close the Opening
Sew the gap closed neatly. Use a ladder stitch for a seamless look so the stitches remain hidden.
Step 6: Create Facial Features
Embroider the eyes, nose, and mouth with embroidery thread. Use fabric markers if preferred. This adds character to your Jennie plush.
Step 7: Add Final Touches
Add any additional details or accessories to personalize your Jennie plush. This could include clothes, a hat, or any unique embellishments.
Following these steps will help you craft a customized Jennie plush doll. With each stitch and detail, you’ll see your plush come to life. Don’t rush the process; enjoy every step of crafting your handmade toy. Happy sewing!
Customizing Your Jennie Plush: Ideas and Tips
Customizing your Jennie plush adds a unique, personal touch that sets it apart. Here are some ideas and tips to personalize your plush doll:
- Choose Custom Colors: Pick fabric colors that resonate with you. They can match your decor or express your favorite hues.
- Embroidery: Add embroidered details like initials, symbols, or patterns. This step adds a crafty flair and a signature look.
- Clothing: Craft mini outfits for your Jennie plush. Create a tiny wardrobe that reflects different styles or occasions.
- Accessories: Consider knitting a small scarf, crafting a tiny hat, or even making shoes. Accessories can often be interchanged for different looks.
- Texture: Mix and match fabrics with different textures. Combine smooth minky with rougher fabric for sensory contrast.
- Scents: Insert a sachet of dried lavender or rose petals inside before sealing. It will add a pleasant smell to your plush.
- Sounds: Place a small bell or rattle inside the plush. It’s perfect if you’re crafting for a child, adding a fun, interactive element.
Remember, the key to customizing your Jennie plush is to experiment and have fun with it. Every addition should make it more special to you or to whomever you’re gifting it. Let your creativity shine, and infuse your personality into the crafting process. With these customizations, your Jennie plush will be one-of-a-kind, much like a piece of art made with love.
Sewing Techniques for Plush Toys
Mastering a few sewing techniques can elevate the quality of your Jennie plush. Here are some tips to hone your skills:
- Straight Stitch: This basic stitch is used for most seams. Keep stitches small and even for strength and a tidy look.
- Backstitch: At the start and end of your sewing, backstitch to secure the threads. This prevents unraveling.
- Ladder Stitch: Ideal for closing the stuffing opening, this invisible stitch leaves no visible seams.
- Blanket Stitch: Used for edging, this stitch adds a decorative border and can be used to attach appliques.
- Satin Stitch: Employ this stitch for a smooth, tightly sewn surface, perfect for details like eyes and mouth.
- Zigzag Stitch: A zigzag stitch can prevent fabric edges from fraying and is also useful for attaching patches.
Always thread your needle with a length of thread that’s comfortable to work with, usually no longer than 18 inches, to prevent tangling. When sewing, keep fabric flat and tension even. Take breaks if you’re hand-sewing to maintain consistency in your stitches.
By applying these techniques, you’ll not only ensure that your Jennie plush is durable but also give it a professional finish. Regular practice will improve your sewing abilities, making future projects even more successful.
Adding Details and Personal Touches
Adding details to your Jennie plush can make it truly special and preserve its uniqueness. Here are some ways to add personalized details to your plush:
- Facial Expressions: Craft distinct expressions by adjusting the shape of the eyes or the curve of the mouth using embroidery.
- Textures and Patterns: Use fabrics with patterns or different textures to give your plush a distinctive feel and look.
- Unique Embellishments: Attach beads, buttons, or sequins. These can serve as eyes or just decorate the plush.
- Custom Tags: Create a little tag with a name or message. Sew it onto your plush as a personal signature.
- Themed Variations: Reflect holidays, seasons, or events. Dress your Jennie plush in a costume for Halloween or a festive outfit for Christmas.
- Special Stitching: Use colorful threads for a contrast stitch. This adds visual interest to the plush’s seams.
- Interactive Elements: Adding zippers or pockets can make your Jennie plush more interactive and fun.
Remember, the smalldetails can make a big impact. Choose those that have meaning to you or the recipient. Your personalized Jennie plush will not only become a cherished toy but also a keepsake filled with love and individuality.
Safety Considerations When Crafting Plushies
Crafting a Jennie plush doll can be a joyful process, but it’s important to keep safety in mind. Whether you’re creating for a child, a friend, or for yourself, ensuring the plushie is safe to handle and play with should be a top priority. Here are some safety tips to follow:
- Use Non-toxic Materials: Select fabrics, paints, and adhesives that are non-toxic. This is especially crucial if the plush toy will be given to a child.
- Avoid Small Parts: For younger children, avoid using small pieces like beads or buttons that can be choking hazards. Instead, embroider or paint details on.
- Secure Attachments: Ensure that any added elements, such as ribbons or appliqués, are securely attached to prevent them from being pulled off.
- Test for Durability: Give the plushie a gentle pull test to make sure nothing comes loose. It’s important that it withstands regular play and cuddles.
- Washable Materials: Use materials that can be easily cleaned. Plush toys should be washable to maintain hygiene.
- Fire Safety: Stay away from materials that are highly flammable. Always choose fabric that’s safe and doesn’t catch fire easily.
- Soft Edges: Ensure all edges of the plushie are soft and there are no sharp corners or hard parts that could cause injury.
- Double Check the Stuffing: Confirm that the stuffing material is hypoallergenic and that it’s packed in such a way that it doesn’t create hard lumps.
By paying attention to these safety tips, your handcrafted Jennie plush will not only be adorable but also safe for everyone to enjoy.
Caring for Your Handmade Jennie Plush
Taking care of your handmade Jennie plush will ensure it remains in great condition for years to come. Here are some straightforward and practical tips for maintaining your plush toy:
- Gentle Cleaning: Clean your Jennie plush with care. Use a soft brush or cloth to dust it off. For stains, use a damp cloth with mild soap. Gently spot clean and let it air dry.
- Avoid Harsh Chemicals: Steer clear of strong detergents or bleach. These can damage the fabric and cause the colors to fade.
- Wash Sparingly: Only wash your Jennie plush when necessary. Frequent washing can weaken the fabric and stitching.
- Hand Wash Preferred: If a full wash is needed, opt for hand washing. Use cool water and a mild soap. Gently squeeze the soap through, then rinse thoroughly.
- Drying: Never wring out your plush. Instead, press out the water gently. Lay flat or hang to dry, avoiding direct sunlight and heat.
- Regular Maintenance: Check your Jennie plush regularly for loose threads or tears. Fix any issues promptly to prevent further damage.
- Safe Storage: Store your plush in a cool, dry place. Keep it away from heat sources and direct sunlight to prevent fading.
By following these care instructions, your Jennie plush will remain a cuddly companion for a long time. Regular maintenance and gentle cleaning will preserve its look and feel, keeping your handmade creation both safe and snuggly.