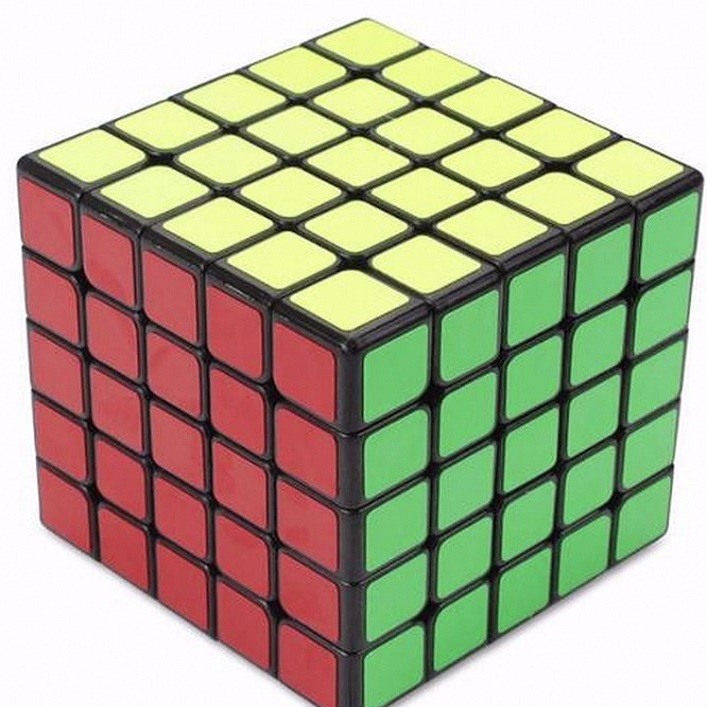
Introduction to the 5×5 Rubik’s Cube
The 5×5 Rubik’s cube stands as a thrilling challenge for puzzle enthusiasts. Unlike its smaller predecessors, the 5×5 cube, also known as the Professor’s Cube, offers a complex level of difficulty that excites even seasoned solvers. It boasts a staggering number of possible positions—far more than the 3×3 cube— making it an intriguing beast to tame.
It consists of 9 center pieces on each side, 12 edge pieces, and 8 corner pieces, calling for advanced solving techniques. This cube not only sharpens the mind but also helps improve memory and problem-solving skills. For those ready to step up from the classic cube, the 5×5 rubik’s cube solver is an invaluable companion on this journey. It guides through intricate algorithms and provides tips to maneuver through the most daunting scrambles.
As we delve deeper into the art of solving this puzzle, remember that patience and practice are pivotal. Whether you’re a beginner or a professional looking to refine your technique, mastering the 5×5 Rubik’s cube is a rewarding endeavor. Our guide is designed to lead you through every twist and turn, ensuring your solving journey is as smooth as the cube’s rotations. Let’s embark on this cubic adventure together!
Essential Tools and Accessories for Solving
Before diving into the details of solving the 5×5 Rubik’s cube, it’s important to gather the right tools and accessories. These not only assist in the actual solving process but can also help improve your practice sessions. Whether you’re starting your solving journey or looking to perfect your speedcubing techniques, here are essential items to have:
- Lubricant: Proper cube lubrication ensures smooth and fast rotations. Silicon-based lubricants work best.
- Timer: Timing your solves is crucial for tracking progress and setting goals. Use a speedcubing timer or any stopwatch app.
- Solution Guide: A robust 5×5 rubik’s cube solver guide book or app will offer step-by-step solutions and algorithms.
- Mat: A soft mat to lay your cube on can help protect it from damage during fast turns and drops.
- Stand: A cube stand is useful for displaying your cube or holding it in place during study sessions.
- Cleaning Cloth: Keep a microfiber cloth handy for wiping off fingerprints and dust to maintain your cube’s condition.
With these tools and accessories at your disposal, you’ll enhance your solving experience and be better prepared to conquer the 5×5 Rubik’s cube with efficiency and skill. Remember, though, that while these items can greatly assist you, consistent practice remains the key to mastery.
Basic Notation and Terminology
Before tackling the 5×5 Rubik’s cube, understanding the basic notation and terminology is crucial. This common language allows cubers to communicate solutions and techniques effectively. Here’s a breakdown of the essentials:
- Faces: Each of the six sides of the cube is a face denoted by its middle color.
- Layers: The cube consists of various layers that turn independently, marked as U (up), D (down), L (left), R (right), F (front), and B (back).
- Turns: A 90-degree clockwise rotation of any layer is a ‘turn’. An apostrophe after a letter (e.g., U’) indicates a counter-clockwise turn.
- Wide Moves: Turns that involve two layers at once are ‘wide moves’. These are denoted by adding a ‘w’ to the layer (e.g., Rw).
- Slices: The middle layers that turn between the outer layers are called ‘slices’, marked as M (middle), E (equator), and S (standing).
- Cube notation: A sequence of letters and symbols that describe a series of moves to perform – crucial for learning algorithms.
Grasping this terminology and notation is the first step in becoming a proficient 5×5 rubik’s cube solver. With these basics, you’ll be ready to progress to solving the center pieces and beyond. Practice using the notation as you perform moves on your cube, reinforcing your understanding and fluency.
Solving the Center Pieces
When tackling the 5×5 Rubik’s cube, solving the center pieces is the first major step. Unlike smaller cubes, the 5×5 features fixed centers; therefore, identifying the center color is vital to building a solid foundation for the remaining solution.
Begin by choosing one face to start with, typically the white center. Focus on creating a 3×3 block of the same color. Use the available turns and wide moves learned from basic notation to manipulate the center pieces into place. Remember, it’s okay to disrupt the outer layers as they will be solved later.
Once the first 3×3 center is complete, rotate the cube to work on the opposite center, which is typically yellow for standard color schemes. Mirror your moves from the first center, ensuring that both centers are correct and opposing each other.
Continue this process with the remaining faces, keeping in mind the color order. Adjacent to the white center should be, in clockwise order, the blue, red, green, and orange centers. Focus on one color at a time and always check that the newly formed center aligns with the previously solved centers.
Throughout this stage, the ‘replacement technique’ can be incredibly helpful. This involves temporarily moving a piece out of place to insert another piece before returning it back to its original position. Practice this to minimize moves and increase efficiency.
With patience and persistence, you’ll have all six centers solved. Remember that the 5×5 rubik’s cube solver journey is not just about speed but also about understanding and precision. Each move should be deliberate and thoughtful, setting the stage for successful edge pairing in the next steps.
Edge Pairing Strategies
Once the center pieces of the 5×5 Rubik’s cube are in place, edge pairing is your next hurdle. This step involves matching the 12 edge pairs scattered across the cube. The method can be tricky but with a few strategies, it becomes manageable. Here’s how to approach it:
Identify Edge Pairs:
Start by locating two edge pieces with the same color combination. Pay attention to both sides of the piece.
Utilize the ‘Slice and Replace’:
This technique involves slicing the middle layer to pair edges, then replacing the unmatched edges back to their original positions.
Preserve Completed Centers:
While pairing edges, ensure you don’t disrupt the solved centers. Use the cube’s upper and lower layers to move pieces around.
Freestyle Pairing:
Once comfortable, try freestyle pairing. This is matching edges without a set sequence, leveraging intuition and practice.
Avoid Redundancy:
Work to minimize moves. If you see an opportunity to pair multiple edges with one slice, take it.
Repeat the Process:
Continue pairing until all edge pieces form a uniform block on each side of the cube.
Remember, speed is not the goal here; focus on accurate and intentional moves. Practice these strategies, and you’ll become a more efficient 5×5 rubik’s cube solver. With edge pairing mastered, you’ll be well on your way to solving the entire puzzle.
The Reduction Method Explained
Once center pieces and edge pairs are solved, the reduction method comes into play. This technique simplifies the 5×5 Rubik’s cube to a 3×3 cube, making it easier to apply familiar 3×3 solving strategies. Here’s how to execute the reduction method:
- Group Edge Pairs: Join the matched edge pairs to form full edges. Position them so they match the center colors.
- Solve Like a 3×3 Cube: With centers and edges aligned, treat the cube as if it’s a 3×3. Use the algorithms you know to solve the first two layers (F2L).
- Adjust Centers if Needed: Sometimes center pieces might not be in the right order. If this happens, use center-switching algorithms to correct them.
- Be Mindful of Parity: The 5×5 cube can have parity problems not seen in a 3×3 cube. Learn parity algorithms to resolve these issues.
Keep practicing the reduction method. As a 5×5 Rubik’s cube solver, mastering this will greatly improve your solving times and efficiency. Remember, each step builds on the last, so ensure previous stages are completed accurately.
Last Two Edges (L2E) Algorithms
Once you have solved the center pieces and edge pairs using the reduction method, you will encounter the Last Two Edges (L2E) situation. At this stage of solving the 5×5 Rubik’s cube, you may find two edge pieces that are not matched. These are the final pairs you need to solve before moving on to the last layer. To handle this, you will use specific L2E algorithms designed to pair the last two edges without disrupting the rest of the cube.
The key to mastering these L2E algorithms is to recognize the patterns that need solving and apply the correct sequence of moves. Here are some tips to help you tackle the L2E challenge:
- Identify the Pattern: Look at the two edges and determine the pattern they form. Different patterns require different algorithms.
- Apply the Algorithm: Execute the L2E algorithm that matches the pattern you have identified. Perform the moves carefully to avoid errors.
- Practice: The more you practice these algorithms, the faster you will recognize patterns and perform the sequences.
- Check your Work: After applying an L2E algorithm, always check to make sure the edge pieces are correctly paired. If not, you may need to try a different algorithm.
Remember, mastering L2E algorithms takes practice. As a 5×5 Rubik’s cube solver, familiarity with these algorithms will significantly improve your efficiency. With these edges paired, you are one step closer to solving the entire cube. Keep practicing, and you will see your solving times decrease as your skills strengthen.
Final Layer Permutation and Orientation
After solving the centers and edge pairs of the 5×5 Rubik’s cube, the next step is the final layer. This involves permuting (moving) and orienting (flipping) the last layer pieces into their correct positions. The following strategies will guide you through this stage:
- Position the Corners: First, make sure the corners of the last layer are in the right spot. You don’t need to worry about their orientation yet. There are specific algorithms to cycle three corners until each one is in the correct location.
- Orient the Corners: Once the corners are positioned correctly, the next step is to orient them. This could mean flipping them so that the upper face of each corner has the same color. Apply the correct algorithm until all corners are properly oriented.
- Permute the Edges: After the corners are set, focus on the edge pieces. Use algorithms to move these edges around without disturbing the corners until each is in the right place.
- Orient the Edges: The final step is to flip any edge pieces that are in the right position but not correctly oriented. There are certain moves that can flip the edges without affecting their positions.
The process of solving the final layer may require you to repeat certain algorithms multiple times. Familiarity with each step is crucial for becoming a proficient 5×5 Rubik’s cube solver. With practice, you’ll be able to perform these moves quickly and accurately, bringing you closer to completing the puzzle.
Remember to practice these moves regularly and always check your cube after each algorithm to ensure every piece is where it should be. Consistent practice is key to reducing your solve times and becoming an expert cuber.
Practice Techniques and Time Reduction Tips
Becoming an adept 5×5 rubik’s cube solver involves not just knowing the steps but also improving your speed. Here are some practical tips to enhance your practice regimen and reduce your solving times:
- Consistent Practice: Allocate daily time for practice. Repetition helps to internalize algorithms and improve muscle memory.
- Timed Solves: Use a timer during practice sessions. Tracking solve times helps identify improvement areas.
- One-Look Solving: Aim to predict moves. Train yourself to identify patterns and plan sequences of moves ahead of time.
- Algorithm Drills: Focus on practicing specific algorithms repeatedly. This improves your speed for those tricky situations.
- Optimize Finger Tricks: Use finger tricks instead of wrist movements. Efficient finger movements can greatly increase turn speed.
- Scramble Variety: Solve from different scrambles. Varied starting positions prevent over-reliance on memorized solutions.
- Record Keeping: Note down your solve times and the sequences used. Reviewing this data can show progress and areas needing work.
- Rest and Recovery: Avoid fatigue which can slow reflexes. Take breaks to maintain peak cognitive function.
- Solve Challenges: Attempt solving in different environments. This can increase adaptability and focus.
- Video Analysis: Record your solves and watch them. Observing your technique can reveal inefficiencies in your method.
By incorporating these techniques into your practice routine, you will enhance your solving skills and naturally start to reduce the time it takes to solve the 5×5 Rubik’s cube.
Advanced Strategies for Speedcubing
To excel at speedcubing with the 5×5 Rubik’s cube, advanced strategies are essential. They refine your solving technique and cut down your solve times. Here are strategies to level up your speedcubing game:
- Cross-Training with Different Cubes: Work on various types of cubes. It sharpens your skills and improves adaptability.
- Algorithm Optimization: Review and refine your algorithm set. Find shorter or faster sequences for common situations.
- Mental Mapping: Visualize the solve steps in your mind. This mental practice can speed up your physical moves.
- Inspection Time Maximization: Use your inspection time wisely. Plan as many moves as you can before you start the clock.
- Reconstruction of Solves: After solving, step through your moves again. Figure out what worked and what could be faster.
- Finger Trick Mastery: Perfecting finger tricks is crucial. They allow for quicker turns and less hand movement.
- Intuitive Last Layer: Develop an intuitive understanding of the last layer. It helps in finding the fastest solution paths.
- Look-Ahead Training: Practice looking ahead to the next move while performing the current one. This reduces pause times between moves.
- Priority-Based Solving: Identify key moves or algorithms to solve first. It can grant a smoother and faster solve process.
- Breathing and Focus: Stay calm and breathe properly during solves. It keeps your mind clear and fingers agile.
Combine these advanced techniques with consistent practice to become a formidable 5×5 rubik’s cube solver in the speedcubing community. Remember, every second saved is another step towards mastery.